Aha! Roadmaps | Publish a presentation
Aha! presentations make it easy to take the roadmaps and reports you built in Aha! Roadmaps and share them with your audience. You can add nearly any view in your Aha! Roadmaps account to a slide, customize your presentation, and then publish it as a secure webpage or PDF, depending on your needs. Be sure to consider the security settings for your published presentation.
Click any one of these links to skip ahead:
Publish to a secure webpage
Secure web presentations are externally accessible pages that allow your stakeholders to access the views in Aha! Roadmaps that you choose to share.
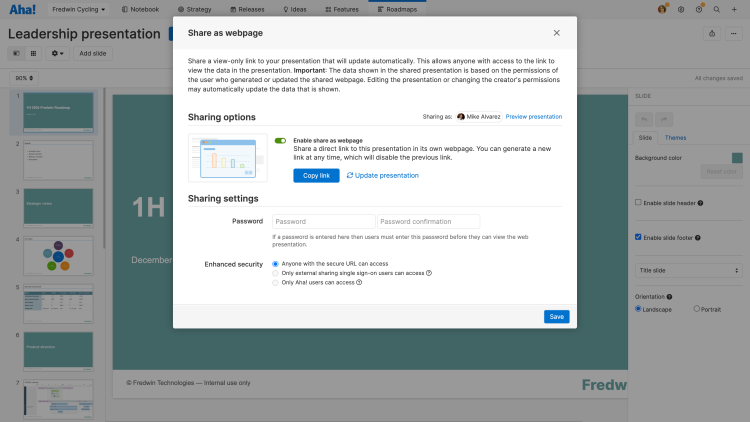
To publish your presentation to an external URL, click the Export button in the upper right and select Shared as webpage. When the Share as webpage modal opens, use the toggle next to Enable share as webpage on in the Sharing options section. Click the blue Copy link button when it appears for a shareable link to your presentation.
In the Sharing settings, you can configure additional optional security methods. Enter a Password if you want to password-protect the presentation. When you do, anyone who wants to view shared webpage with your presentation will need to enter the password to view it.
Next to Enhanced security, you can further define sharing settings to single sign-on users or Aha! users if you choose.
Use web presentation controls
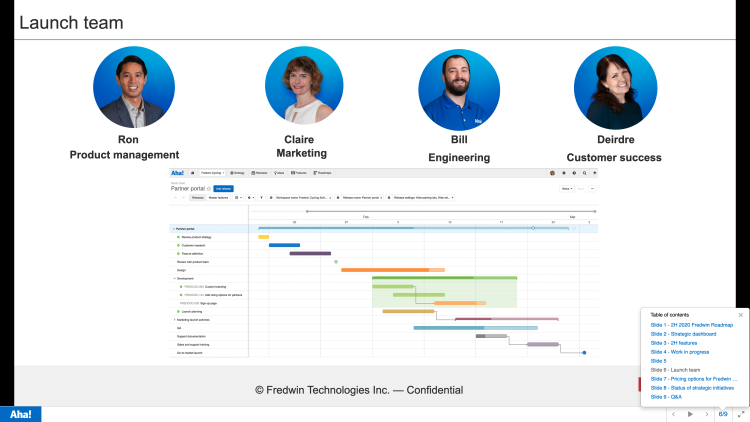
When you have opened the secure webpage, you can use the web presentation controls in the bottom-right corner to navigate forward and backward, enable autoplay, access the table of contents, and toggle to view a fullscreen version of the presentation.
Publish to a PDF
If you prefer a static, downloadable version of your Aha! Roadmaps presentation, publish it to a PDF.
To do this, click the Export button and select PDF document. The Export as PDF window will open, giving you options to configure your PDF:
Optimize for: Allows toggling whether the PDF presentation is optimized for viewing or printing. Optimizing for viewing removes page size constraints.
Paper size: Defines the paper size to be used when the PDF is optimized for printing.
Orientation: Choose between portrait or landscape orientation of pages within the PDF.
Click Generate PDF. Once it has been generated, click Download PDF to download it. Click Update PDF to publish the latest changes to your presentation to a PDF.
Slide transitions
Enable animations: Allows enabling and disabling of the page-flipping animation when transitioning between pages in a web presentation.
Autoplay slide duration: The time in seconds between slide transitions during autoplay.
Click Save to save your changes.
Enable interactive views
If you publish your presentation to a secure webpage, you can choose to make your presentation views interactive.
By default, views in presentations published to webpages are static: each presentation slide displays your view without giving anyone access to the data you used to create that view. For some audiences, however, you might want to allow a deeper level of detail.
For example, a group of power users might appreciate the ability to click into individual feature descriptions — but you might not want to share custom fields about expected revenue. Presentation interactive view settings control what records in your view can be previewed, and which fields on those records to include in the preview.
At the top left of your screen, click Customize presentation ⚙️ Interactive view to get started.
From the Configure interactive views modal, click Allow drill in for the records below.
Next, select which record(s) you want your users to be able to click into.
Finally, use the dropdowns on the right side of the modal to select which standard or custom fields you want your audience to see when they drill in to a given record.
You can also choose to Add a record type to the list of interactive record types, and select standard or custom fields from its field list as well.
Everyone who accesses your external webpage can see the same drill in information. Users in your Aha! Roadmaps account can also click View in Aha! on any drill in preview to open the record in your Aha! Roadmaps account after logging in.
Your record and field changes will be saved automatically. Click Close when you are done.
If you want to enable or disable interactive views entirely, you will need to click Update secure webpage to apply those changes.
Individual Aha! saved views that have been shared as webpages can be interactive too!
Adjust view update frequency
Some views in your presentation you might want as static images, while others you might want to update manually or automatically so that the presentation stays perpetually up-to-date. Each view in a presentation can have its own update frequency.
To do this, click on the Aha! Roadmaps view that you wish to update. From the Update frequency settings on the right sidebar select one of three update frequency options.
Live update: Automatically updates the page every time the data is changed in Aha!
Refresh on update: Only updates the page when the manual Update secure webpage button is clicked.
Manual snapshot: Creates a static, point-in-time reference of the page.
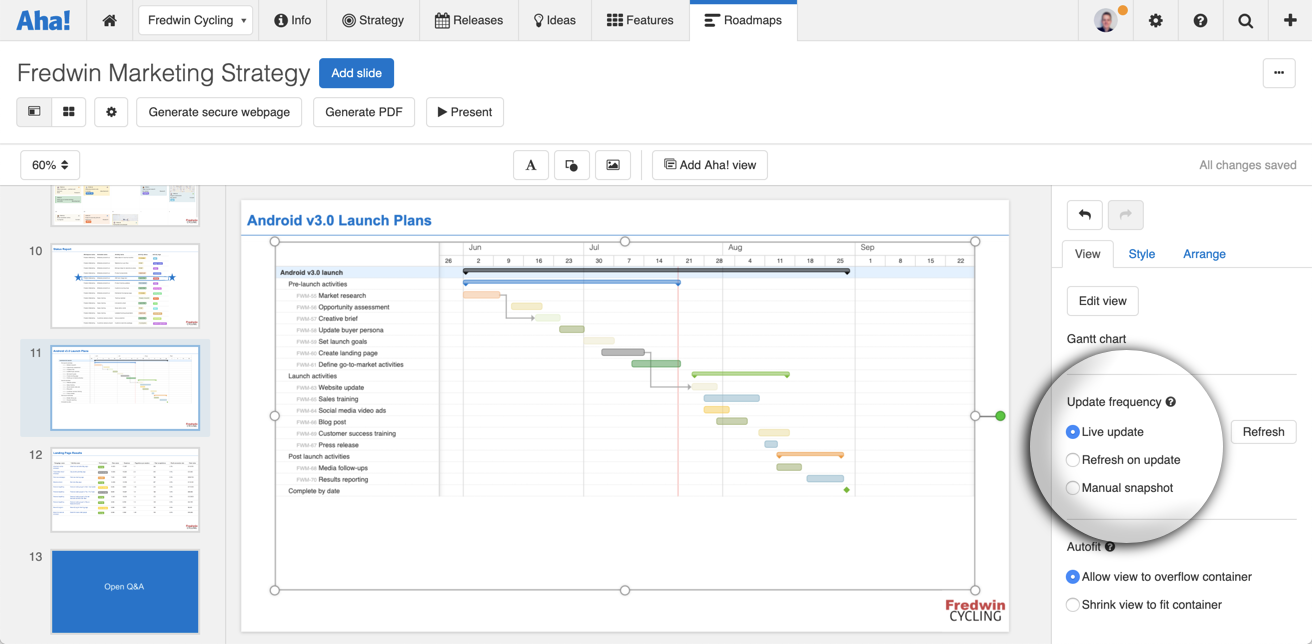
The frequency you select for each view will be reflected when you present your presentation in Aha! Roadmaps, and when you publish it to a secure webpage.
Custom brand your presentation
There are two ways to apply consistent branding to the presentations in your account.
Administrators with customization permissions can add primary and secondary logos to presentations.
Workspace owners, contributors, and any users with appropriate custom user role permissions can create presentation themes. Presentation themes allow you to style title and body slide layouts, then apply those layouts to every presentation that uses the theme. This is a great way to infuse your team's presentations with consistent branding, style, and assets.
First, let's discuss logos. If you are an administrator with customization permissions you can add your logo(s) to all presentations in your account by navigating to Settings ⚙️ Account Profile Custom branding.
Your custom branding will appear to account users and in reports, roadmaps, and presentations.
Each logo you upload should be at least 480x300 pixels and ideally in a ratio of 1.6:1.
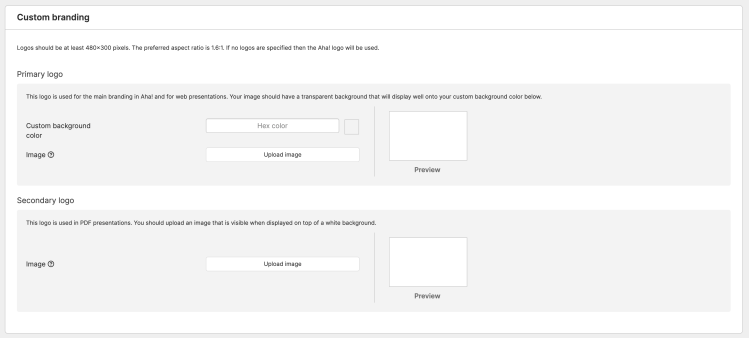
Your Primary logo will be used for branding throughout your account and in presentations that you have published to a webpage. You should upload an image with a transparent background. You may also select a Custom background color.
Your Secondary logo will be used in presentations that you have exported to PDF. You should upload an image that is visible when displayed on top of a white background.
Second, let's discuss presentation themes.
To create a theme, first create a presentation. On the right side of the slide editor, click the Themes tab, then click Edit theme layout to open the Theme editor.
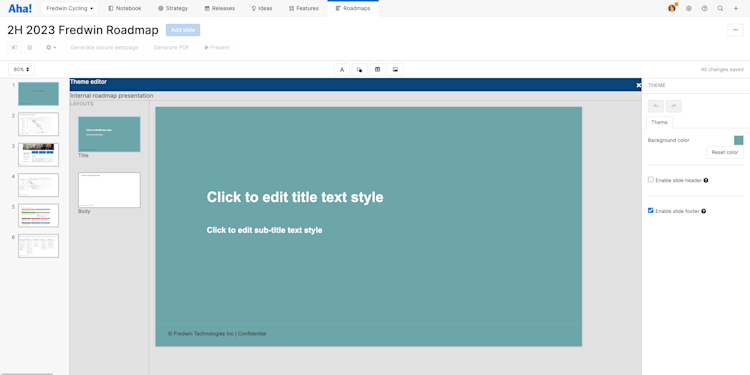
Every presentation theme has two layouts.
The Title slide determines how title slides will look in presentations using your theme.
The Body slide determines how body slides will look in presentations using your theme.
You can edit and customize theme layout slides just as you would a regular presentation slide, but changes you make to a theme layout slide will apply to the slide layouts of every presentation that uses your presentation theme, so be intentional about what content and design elements you add to these theme layout slides.
The one exception to this rule is text style boxes. People who create a presentation based on your theme will likely want to add unique titles, sub-titles, or body text to their presentation — but you may wish to standardize the look of that text. Click on a text style box — a text box containing the text Click to edit text style — to do this. Then use the Style, Text, and Arrange tabs on the right side to adjust the text style.
Once your theme looks good, click the X in the upper right corner of the Theme editor to leave the editor. Back in your presentation, click the Themes tab in the slide editor, then click the Share icon to share your theme with the rest of your Aha! account.
Embed your presentation in another webpage
There are several ways to embed a published presentation into another webpage:
Include a link to your published presentation. Make sure to use the URL from the Open secure webpage button. It will look something like this:
https://your-domain.aha.io/published/fd554ce954c03d2fa032a233f
Include your presentation in an iframe like the example below:
<iframe src="https://your-domain.aha.io/published/fd554ce954c03d2fa032a233f" style="width: 100%; height: 550px;" frameborder="0" scrolling="auto" seamless="seamless"></iframe>
Embed only a single presentation page on another webpage. This option does not include any branding.
First, select the Update secure webpage button to ensure everything is updated.
Next, click the Open secure webpage button.
From the presentation webpage, navigate to the slide you want to embed and right-click to inspect the live code. In Chrome, the menu option is called Inspect; in Firefox, it is called Inspect Element.
Find the correct iframe element. There will be more than one iframe, so make sure you locate the correct one like the example below: Replace data-url with src. The end result should look like this: <iframe src="https://your-domain.aha.io/published/fd554ce954c03d2fa032a233f/snapshot/6119135030950" frameborder="0" scrolling="auto" seamless=""></iframe>
You can also change the other attributes to properly fit the slide into your own webpage.
Keep in mind that frames are dynamically rendered onto the page, so you must use your browser's element inspector rather than viewing the full-page source. Secure URLs are unique and live with the presentation. This means that you can update the content of your presentation by clicking the Update secure webpage button and the URL will not change. When updating, you do not need to modify the page hosting your presentation.
Notes on embedded presentations
Enterprise+ customers, please note that if you have enabled IP based access control, external users may be blocked when attempting to access the presentation from outside of the specified IP addresses.
Only publicly viewable presentations can will be visible when embedded in locations outside of Aha! Roadmaps. This is because browsers prohibit login pages in iframes as a security standard. Password protected presentations will display a blank page when embedded. To ensure your embedded presentation is viewable, configure your presentation security options to Allow anyone to access.
To allow the browser control that enables fullscreen to be used from within the iframe, the iframe tag needs another attribute like the following example:
<iframe src="https://your-domain.aha.io/published/fd554ce954c03d2fa032a233f/snapshot/6119135030950" style="width: 100%; height: 550px;" frameborder="0" scrolling="auto" seamless="seamless" allowfullscreen="true"></iframe>
