Aha! Whiteboards | How to run SAFe® PI planning with whiteboards
Whether your team relies on the Scaled Agile Framework® (SAFe®) or is SAFe-ish, the program increment (PI) planning ceremony is key. In two days, the entire agile release train (ART) will move from backlogged priorities to a full-fledged PI that will define the next eight to 12 weeks of the product roadmap.
But without the right tools, PI planning sessions can trend toward trouble. It is not easy to align an entire ART around a plan while also addressing every dependency and risk.

In this article, we will run a PI planning session using whiteboards, using Fredwin Technologies, a fictitious company. Teams can update the program board in real time, move to breakout sessions without switching contexts, and review the completed plan — all while staying on the same page. Follow along and give it a try!
This article was inspired by a live tutorial we recorded. Head there to hear Aha! product experts Emily Yankush and Sarah Moisan-Thomas walk through these steps!
Click any of the following links to skip ahead:
Confirm user permissions
Action | User permissions |
Capture Aha! features | |
Create whiteboards | |
Share whiteboards | |
Comment on whiteboards | |
Edit whiteboards | Contributor or guest |
Add Jira records to a whiteboard | Contributor or guest |
Prepare your whiteboard
Let's get the whiteboard ready for this session. If you are following along:
Navigate to Knowledge Documents.
Click Add Use a template. We do not have to start from scratch!
Search for or scroll to find the SAFe PI planning template bundle. Click Use template to insert it.
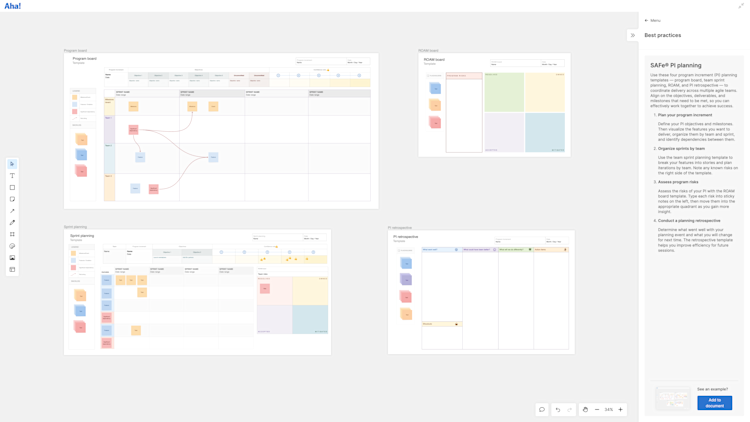
Our whiteboard now includes four templates that we will use during the PI planning session:
A program board for defining PI objectives, milestones, and the features you want to deliver by team and by sprint
Sprint planning so each team can break features into user stories (we will duplicate this template for each team in our ART)
A ROAM board to capture any risks that could impact our PI
A PI retrospective to identify opportunities to improve the PI planning event for next time (and celebrate successes)
Aha! Roadmaps customers and Aha! Whiteboards Advanced plan customers can save customizations they make as custom templates that their entire account can access.
Again, we need to duplicate the Sprint planning template. Our ART has seven teams in it, and each team will need its own version of the template for the team breakout sessions:
Click and drag to select everything in the Sprint planning frame.
Right-click and select Copy objects.
Scroll elsewhere on the whiteboard canvas and right-click to Paste objects.
Click the upper-left corner of the frame to rename it. We will name each of ours in this format: "[Team name] breakout."
Repeat these steps to create enough frames for each team.
Capture features and capabilities
To start, we need to define the work that the ART will prioritize during the PI planning session. As a product manager, we have high-level features already defined and prioritized on a features prioritization board here. The top 10 features in the program backlog will move into the increment. Developers will then break them down into stories.
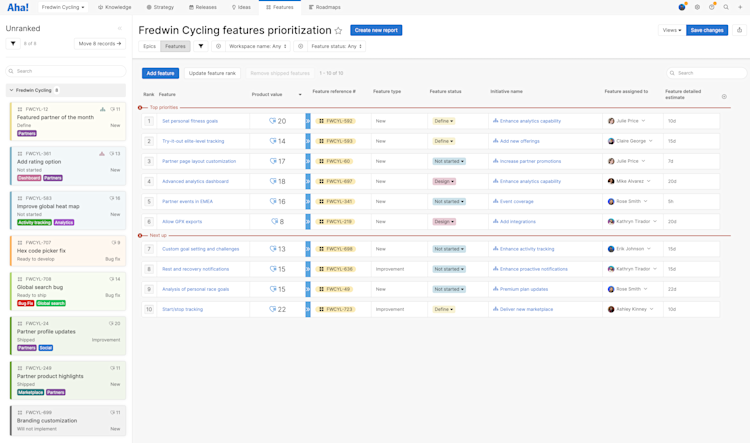
To add those features to our whiteboard:
Navigate to Features Prioritization.
Click Share Add to whiteboard as records.
Choose an Existing whiteboard and select our PI planning whiteboard.
Click Add to whiteboard.
We will see all those features as record cards on our whiteboard. We can also drag them to the appropriate place on the program board or double-click them to open a drawer view of a record and adjust its details.
Development teams have their own technical work to bring to the planning session. The Fredwin Technology engineering team uses Jira. To bring their enablers and nonfunctional requirements into our program board, we can paste in links to the Jira stories:
Open the Jira account and find the prioritized records.
Open each story and click to copy its link.
Paste the link in the program board (at the appropriate place on the whiteboard).
We need to authenticate our Atlassian account the first time we do this. But afterward, we can paste in as many links as we need to. Those will display as record cards just like the Aha! records do — and we can click the links to adjust details in a new browser tab.
These two sources will populate our program board. As teams break down work, they will use sticky notes to capture new user stories or requirements. And we can convert those whiteboard objects to actual records in Aha! Roadmaps when the planning session ends.
Share your vision and set context
Before teams break out to plan the increment, they need to know the business context, product vision, and architectural limitations. The through line in each of these sessions involves accuracy and motivation. Teams need to know why the increment matters so they are inspired to commit to ambitious, achievable work.
Just before lunch on the first day, our release train engineer (RTE) will lead a session to explain the planning process and expected outcomes for the event. This is the perfect time to introduce teams to our whiteboard:
Navigate to the new whiteboard.
Orient the teams to the templates on the whiteboard.
Expand the frame navigation list in the right panel and explain how teams can access the breakout frame or review the program board in progress.
Explain how to use lines and connectors to add dependencies between features (and how to color dependencies red or gray).
Explain how team members can comment on whiteboard objects.
Open an example Aha! record on the program board.
Walk through the Overview tab and any custom fields you added to the layout.
Click into the Requirements tab (in SAFe terminology, this is the User stories tab) and explain how to segment a feature into individual user stories.
Repeat this step with a Jira record. Note that individuals will need to authenticate their Atlassian accounts the first time they access one of the links.
Provide any planning context that does not involve your Aha! account. Then, each team can break off into separate group sessions (perhaps after a refreshing lunch break).
Manage team breakouts
Now that the ART is aligned on context and logistics, we can move to team breakouts. Individual teams will now draft their plans, including risks and dependencies.
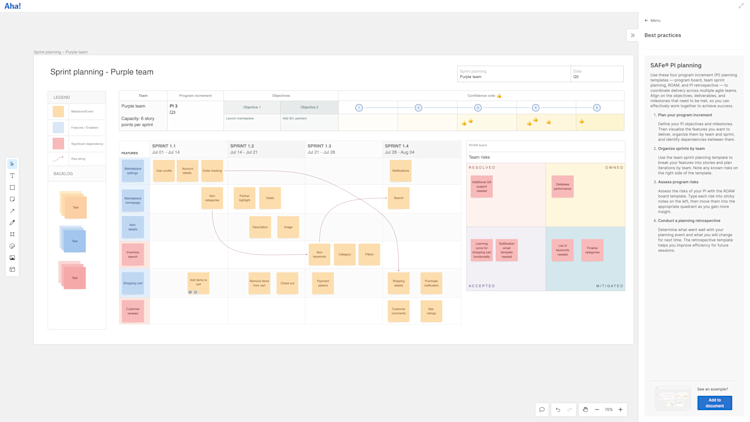
First, they need to plan their capacity: the amount of work they can commit to during each sprint and across the entire PI. Each team can enter its capacity at the top of its planning template so everyone knows how many features they should commit to.
Aha! Roadmaps includes capacity planning for individuals (this is also available for entire teams on the Aha! Roadmaps Enterprise+ plan). Visualize different capacity scenarios compared to estimated effort to predict your plan's success.
Break down work
The teams' first task is to break down top priorities into manageable requirements. This also involves cleaning up the records themselves — making sure everything a team needs to break down a record into its constituent requirements is there.
We can do this directly from the whiteboard:
Click on an individual capability, feature, or requirement to open its drawer view if it is an Aha! record. Jira records will open in a new browser tab.
Adjust record details. Record descriptions should follow the INVEST mnemonic to be clear, feasible, and testable.
Use the first column of the team breakout whiteboard for the prioritized features the team will implement.
Add sticky notes to the whiteboard to define work you broke up into parts.
Add connectors between record cards and the stickies they are broken down into. Later, we can formalize these record links in Aha! Roadmaps and Jira.
Team breakouts involve a lot of discussion. We can add inline comments to any object on the whiteboard to retain some key insights — such as high-level estimates, potential risks, and potential implementation strategies.
Estimate work
Speaking of estimates, teams need to estimate the effort required to implement the work they define. This can be a much more formal process in Aha! Roadmaps, where we can track progress against our estimated capacity in the capacity report. But we do not need to move beyond the whiteboard for this PI planning session:
For simple visual estimates, we can add emoji reactions to work items to indicate T-shirt size or Fibonacci sequence of effort.
For more granular estimates, we can add inline comments to each work item and define the hours or story points needed to complete the work.
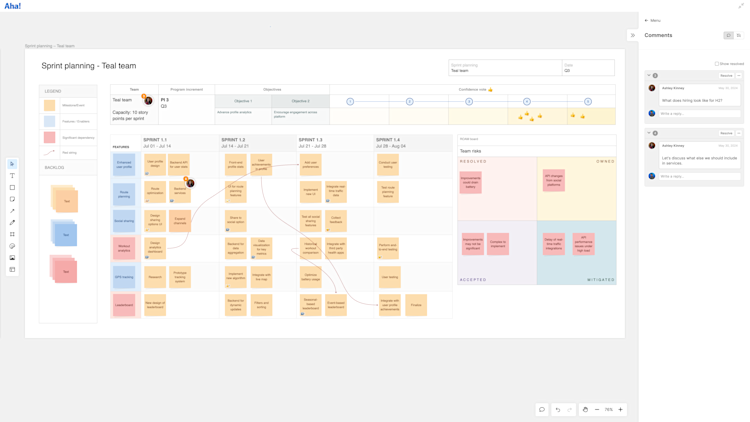
For consistency, every team in the ART should use the same estimation units (time or story points) and the same method (emojis or comments). We will use time and comments for our PI planning session. As estimates accrue on the work items, teams should keep an eye on the capacities they defined at the start of the session. Estimates that push against or past a team's capacity will become a risk that needs to be managed on the ROAM board.
Assign dependencies
The PI planning whiteboard is an excellent tool for seeing our ART's prospective plans. As teams break down work, they can group requirements around their parent records and add record dependency lines using connectors. Teams can also color dependency lines to highlight scheduling problems:
Gray indicates a feasible dependency. Based on the current schedule, nothing will block the dependent record during its scheduled sprint.
Red indicates a problematic dependency. The dependent record is scheduled before the record(s) it depends on. Red dependency lines give teams a visual cue that their draft plans need adjustment.
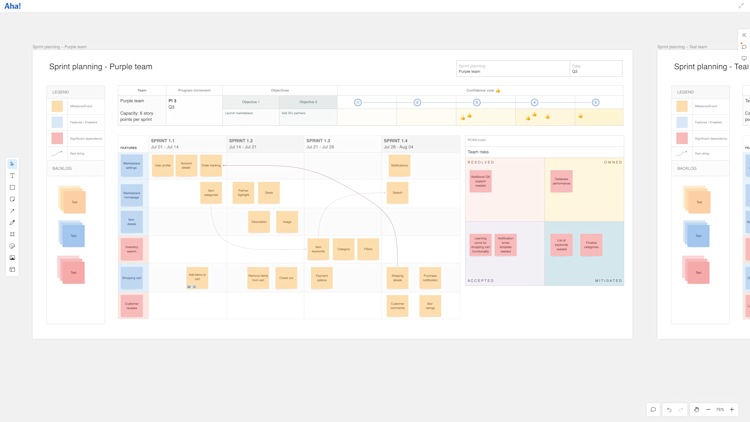
We can formalize the record dependencies in Aha! Roadmaps later — visualizing them using Gantt charts and roadmaps. For now, however, encourage teams to highlight dependencies and try to adjust records' start and due dates to resolve scheduling conflicts.
Flag at-risk items
Items can be at risk for more reasons than simple scheduling. Teams will spend time in their breakouts flagging records for risks, and they can report on these risks during the draft plans presentation. Management can use flagged records in aggregate to discuss PI planning risks during its evening session. If any risks cannot be addressed before the final plan review, they can be formally ROAMed during the program risks session.
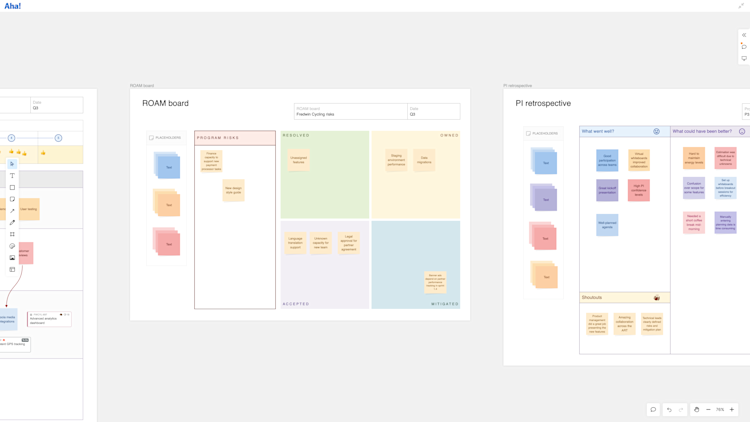
To do this on the whiteboard:
Add a flag emoji to a sticky note or place a flag icon on a record card to visually indicate that it has been flagged.
Add an inline comment explaining the nature of the risk.
Teams, scrum masters, and management can highlight at-risk records by changing sticky notes and record objects to a particular color. Then, users can filter the whiteboard to select only objects that are the "at-risk" color.
After the PI planning session, we can manually (or automatically) flag at-risk records in Aha! Roadmaps.
Scrum of scrums
During team breakouts, the scrum masters from every ART team meet with the RTE to review progress and mitigate potential roadblocks. The meeting is timeboxed to an hour and includes a standard set of questions:
Have you identified the capacity for each PI iteration?
Have you identified most of the stories for the first two iterations and begun estimating?
Have you begun resolving dependencies with other teams?
Are you discussing trade-offs and conflicting priorities with business owners?
Have you identified program risks?
Will you be ready to start writing PI objectives in the next 15 minutes?
Is there anything you need to discuss with other scrum masters? If so, stay afterward.
Use the timer tool to formalize the timebox.
You can answer some of these questions from memory or with the aid of a few notes. Others could benefit significantly from a visual aid. In a PI planning scrum of scrums done with pen and paper, it would not be feasible to show a work-in-progress program board. But multiple people can access our program board whiteboard frame simultaneously. This means teams can keep working while their scrum masters reference the frame during the scrum of scrums. And it keeps the program board contextual for each audience and ensures work can move forward collaboratively.
Use the frame navigator in the whiteboard's right sidebar to navigate to each team's breakout frame or the program board.
Discuss, comment on, and adjust plans as needed.
Present plans
Teams present their plans to the larger ART twice during PI planning: on day one as drafts and on day two as final drafts just before program risks. Our whiteboard creates a shared context around each team's plan.
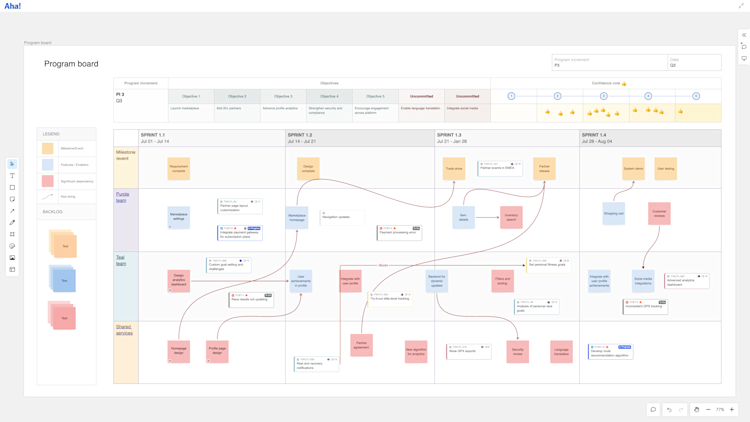
If teams see too many dependencies in their plans, it is a good opportunity for further conversation. Although it is always good to document known dependencies, too many problematic dependencies on the program board might indicate a value stream network that is not well configured. This might be something for management to address during its management review and problem-solving session.
Address risks
In addition to scoping work and tracking dependencies, the ART spends significant time cataloging and addressing risks during PI planning. Any risk the ART can plan against here prevents trouble later on when the PI is actually in progress.
Remember: Anyone can flag an individual record as at risk and comment on why it might miss its planned delivery date.
Teams, scrum masters, and management can highlight at-risk records by filtering the whiteboard to select only objects that are the "at-risk" color.
Use the ROAM board to collect program risks throughout PI Planning, then ROAM each risk during the program risks session. Anyone with access to the whiteboard can jot down a risk they noticed — or add an emoji to a documented risk to emphasize it.
Hold a confidence vote
Once risks are addressed, it is time to make sure everyone in the ART is aligned on our plan. Individual team members need an opportunity to voice any concerns about not achieving our PI objectives. This ensures teams can rework those areas and address problems.
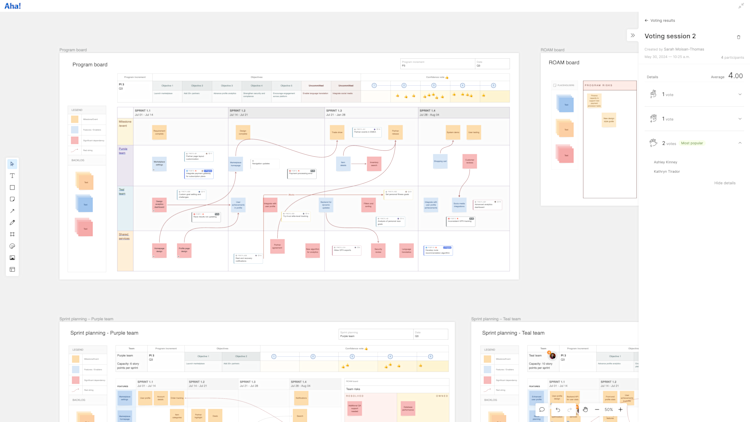
After reviewing the program board, we will hold a confidence voting session. Because we are Aha! Whiteboards Advanced plan customers, this can be a SAFe fist to five session:
Open the right sidebar and click Voting.
Change the voting type to Fist to five. We will add a one-minute Time limit and Start the session.
Everyone can vote to show their level of confidence in our plan. The scale is from zero (no confidence) to five (high confidence).
After everyone has voted, end the voting session and view the results. We want to get a vote of three or higher to indicate adequate confidence. We can quickly see the overall average and the breakdown for each option within our results.
We can drill into the details to see who shared those lower votes and follow up with them to make sure we understand their concerns. Once we mitigate the risks they've raised, we can do another confidence vote to make sure everyone feels good about the new plan.
The results will be saved in the Voting panel if we ever need to reference them again.
Complete the planning retrospective
The last step in PI planning is a retrospective. At this point, everyone in the ART is likely excited about the plans they have created — but tired after two days of intensive work. The retrospective is a critical last step before moving forward, so it is important to structure it correctly.
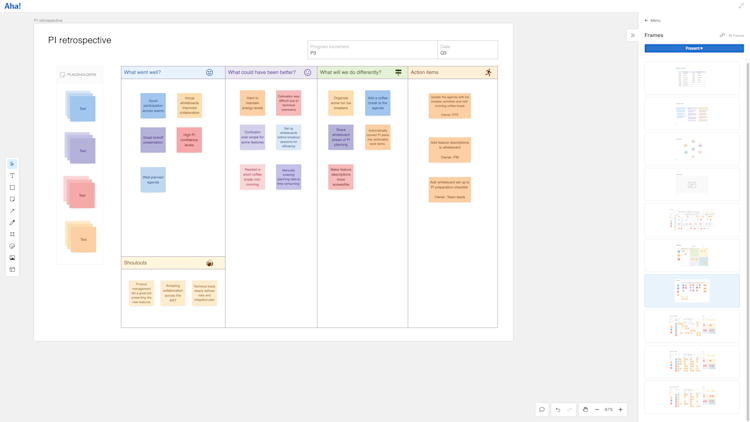
Because we applied the PI planning retrospective template early in our session, members of the ART were able to add feedback there and add emoji reactions to emphasize pre-existing feedback throughout the session. By this point, we should have significant insights on the board.
Use the frame navigator to focus the whiteboard on the PI planning retrospective frame.
Review the observations, consider emoji votes, and discuss action plans.
Then, congratulate the ART! You have all accomplished something wonderful together.
Formalize the plan and start the increment
We have completed the entire PI planning session on our whiteboard. It is now time to move the plan into Aha! Roadmaps, where we can manage the PI throughout its timeline.

From the whiteboard:
Open existing record cards to adjust details, dates, and dependency links.
Convert sticky notes to Aha! records and adjust their details.
Bulk edit records. Select multiple record cards and click Bulk edit to open the bulk editing modal. This is especially useful for adding work to the appropriate epics and strategic themes.
From Aha! Roadmaps:
Enable automatic delivery risks to highlight any work that gets into trouble as the PI progresses.
Visualize our PI using a Gantt chart, roadmap, or the Aha! Develop SAFe program board.
Congratulations! Together, we moved from high-level priorities into an actionable increment — with full alignment across the ART.