Aha! Roadmaps | Roll-up releases
Roll-up releases function as parent releases for several child releases. Roll-up releases exist at the workspace line level of a workspace hierarchy; releases exist at the workspace level.

Roll-up releases are used in a few common situations:
Organizations practicing SAFe that are looking to coordinate a cross-product release train
Organizations looking to standardize the release process across teams, such as a monthly cadence
Organizations looking to coordinate a cross-workspace launch for a major event, such as an upcoming trade show
A roll-up release contains phases and milestones representing the combined delivery steps. It also contains sub-releases, which are releases at the workspace level. Roll-up releases do not contain features — the sub-releases at the workspace level contain the feature content.
Click any of the following links to skip ahead:
This article refers to releases and features. Depending on your workspace type, you may see "schedules" and “activities" in your workspace.
When to use a roll-up release
It's important to understand when to create and when not to create a roll-up release. It can be tempting to divide Aha! Roadmaps workspaces into components based on how your team's development resources work, and then use a roll-up release to represent the actual go-to-market workspace release.
This will lead to undue overhead and should be avoided. For more help determining how to set up your workspace and workspace line structure, read How to define your workspace. Once you decide how to set up your workspace, if you do need to manage components, you can do so through the use of custom fields.
Add a roll-up release
To add a roll-up release, make sure a workspace line has been selected in your workspace hierarchy dropdown in the upper left of your screen.
Navigate to Releases.
Click the Add roll-up release button along the top of the screen.
If you do not see the Add roll-up release button, you are most likely navigated to a workspace, not a workspace line. Workspace lines will show up as bold text in your navigation.
Add sub-releases
A workspace-level release associated with a roll-up release is known as a sub-release.
When you create a roll-up release, you can choose to automatically add a new sub-release to child workspaces, add existing releases as sub-releases once the roll-up release is created, or do some combination of both.
If you choose to create new sub-releases, they will inherit their names and release dates from the parent roll-up release. If you attach an existing release, the sub-release will retain the name, but the release date will change to match the roll-up release. You can always rename sub-releases later.
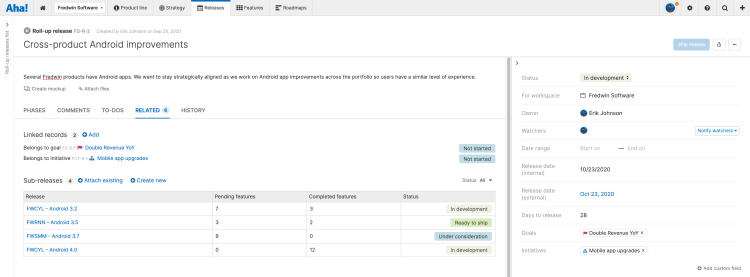
To add sub-releases to the roll-up release, navigate to Releases Details, click on the Related tab, then click Attach existing or Create new.

Customize the Gantt view
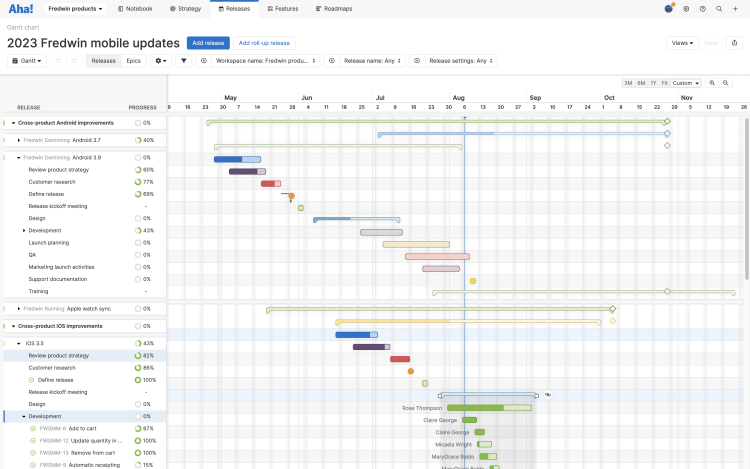
You can further customize the Gantt view of your roll-up release to focus on critical elements of your plan.
From the top of the Gantt page:
Use the filters on top to show or hide different date ranges, workspaces, releases, or shipped releases. If you hover over the filters bar, you can click the Add filters + icon to add basic filters, or click the Edit filters icon to add advanced filters. Note: You can also add the Release settings dropdown as a filter on many roadmaps and reports, where it will allow you to show or hide parking lots and shipped releases.
From the top of the Gantt page:
Use the Gantt type toggle to to choose the record types you want to visualize on your Gantt chart:
Releases, phases, and features: Show features in the context of releases and release phases.
Releases, epics, and features: Show features together with their releases and epics, including epics not part of the features' release.
Epics and features: Show features in the context of their epics, with an expandable section that includes the features' Release names.
Use the Customize view ⚙️ dropdown to customize your Gantt layout.
Customize view: Choose whether to display weekends, assignees, progress, or the progress chart beside each release.
Color bars by: Choose whether you want to color the Gantt bars by Status, Assignee, record Type, or (for Epics and features Gantts) Release.
Sort releases by / Sort epics by: Releases and epics on your Gantt chart are sorted chronologically by their Start dates by default, but you may prefer a different sort order. Use this submenu to sort your releases or epics by Start date, End date, or Name. You can also sort releases by their Release date, and sort epics by their Aha! Roadmaps Score.
Note: If the data you sorted by changes over time (or if you drag the releases or epics to create a custom sort order), your Gantt chart will not automatically re-sort itself. If you ever want to re-sort your data by one of these options, just reselect that option from this submenu.
Manage dependencies: Choose whether to show or hide the connector lines that indicate dependencies, and enable or disable the Other dependency sections for each sub-release. Note: You can also configure connector lines for individual records by clicking the More options menu beside the record name.
From the lefthand side of the page:
Click the More options dropdown beside any roll-up release to:
Edit release details
Hide connector lines. This will hide (or show) the lines that indicate dependencies.
Align with visible children
Hide features with no dates
Click the More options dropdown beside any sub-release to:
Edit release details
Hide connector lines. This will hide (or show) the lines that indicate dependencies.
Align with visible children
Hide features with no dates
Sort phases and milestones by their Start dates, End dates, or Alphabetically. This changes the view for you but not for other people who view the release. To share your view with other people, click Save in the upper-right corner of the page.
Sort features by Rank (their rank on the Features Board), Start date, End date, or Alphabetically. Sorting features on the Gantt view does not affect their sort order in the Features Board view, and does not change the view for other people who view the release. To share your view with other people, click Save in the upper right corner of the page.
Click the More options dropdown beside any release or phase to:
Edit record details. This will open up that record's drawer view.
Align the release or the phase with its visible children. This is useful if you want your release to start with the Start date of your first feature, and finish with the End date of your last feature.
Hide connector lines. This will hide (or show) the lines that indicate dependencies.
Click the More options dropdown beside any feature to:
Edit record details. This will open up that record's drawer view.
Remove from Gantt. This will hide the feature from the Gantt view without removing it from the release. You can click the + icon and Add existing feature to show the hidden feature again.
Hide connector lines. This will hide (or show) the lines that indicate dependencies.
From the Gantt chart:
Click and drag vertically to re-sort the order of any roll-up release, sub-release, feature, epic, release, release phase, or milestone. If a record has child records, it needs to be collapsed before you can move it.
Click and drag horizontally to adjust the dates of any record on the Gantt chart. If the record has child records and is expanded, all child records will move with the parent record. If the record has child records and is collapsed, just the parent record will move.
From the Releases Details page for a roll-up release:
Attach or create new sub-releases according to the unique needs of your release. Select the roll-up release to bring out the release detail drawer (or go to Releases Details). To attach existing sub-releases, click Attach existing release. To create a new sub-release, click the Create new sub-release dropdown, then select the workspace where you would like to create the new sub-release.
The Releases Details view is hidden for new Aha! Roadmaps accounts. If you would like to enable it, you can do so by customizing your menu navigation.
From the Releases Details page for a sub-release:
Add or remove phases and milestones according to the unique needs of your release. Select the release to bring out the release detail drawer (or go to Releases Details). To remove phases or milestones, hover over the desired one and click the x icon to the right. To add, click the Add Phase or Add Milestone buttons.
The Releases Details view is hidden for new Aha! accounts. If you would like to enable it, you can do so by customizing your menu navigation.
Track change history
Your roadmap is an excellent visualization of your product plans — so everyone can stay aligned on your delivery targets. Use the History tab to track scope and timing changes, so that you can review what has changed.
To configure the tab:
Click History to expand (or collapse) the sidebar.
Group the changes, either by Release or Change type.
Select a Date range. This can be useful if you want to show changes in the last time frame, or since the last stakeholder meeting. By default, the date range will be set to the last two weeks.
Next, review changes. There are two types of changes:
Scope changes refer to the addition or removal of features or epics within a release.
Timing changes appear anytime the date on a feature, epic, or release is altered.
Click on any change to see details about it, including the change itself, change type, user who made the change, and date of the change. Click on the changed record or its release to open drawer views of those records and answer any questions or make adjustments.
As your roadmap progresses, you will continue to see changes in the History tab. Check back often to review and investigate how your plans change.
Calculate roll-up release dates
In addition to using sub-releases to align your work, you can calculate a roll-up release's Start date and End date from sub-releases.
To do this, open a roll-up release's details view, then choose Calculate from sub-releases from the dropdown beneath the roll-up release's dates.
Note: Workspace owners can set default record date settings by navigating to Settings ⚙️ Workspace Configure Record dates.
If a roll-up release is set to calculate its dates from sub-releases, and one of those sub-releases' dates change in a way that affects the roll-up release's dates (even through an integration), the roll-up release's dates will update automatically. If a roll-up release is set to calculate its dates from sub-releases, but it doesn't have any sub-releases, its dates will remain blank.
Visualize the roll-up release
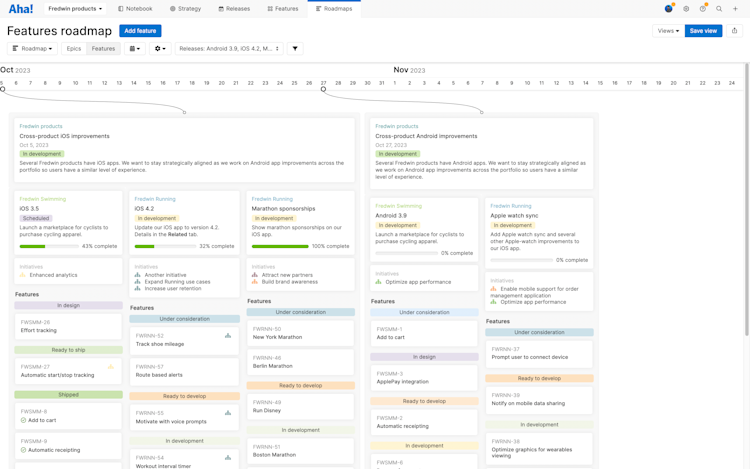
Once you create a roll-up release, you can visualize it and its sub-releases on the Releases Gantt page and the Roadmaps Features page. The Roadmaps Features page is the recommended view to share a visual roadmap of your roll-up release, sub-releases, and the features you wish to highlight.
You can customize what shows by adding releases to the timeline and clicking the X if you do not want to show a sub-release as part of a roll-up release. Then, filter and/or check and uncheck features to focus on only those features that matter most. See Create a features roadmap for more on the Roadmaps Features page.

The roll-up release will automatically be displayed when sub-releases are selected.
Visualize cross-team dependencies
You may want to focus on cross-team dependencies without expanding every item on the Gantt chart. To do this, use the Other dependencies section of the Gantt. This section shows any dependencies that affect a given sub-release and are not otherwise visible on the Gantt chart.
The Other dependencies section currently shows incoming dependencies — anything that a sub-release depends on to complete successfully. It does not yet show outgoing dependencies — anything that depends on a sub-release.
Configure dependencies in the Gantt chart by clicking Customize view ⚙️ Manage dependencies. From here, show or hide the connector lines that indicate dependencies, and enable or disable the Other dependency sections for each sub-release.
Use the left-side arrows to expand or collapse roll-up releases, sub-releases, release phases, and epics. Any incoming dependencies between an expanded and a collapsed element will be visible in the Other dependencies section of the Gantt.
Roll-up releases across workspace lines
A roll-up release is created at a workspace line level. It can only contain sub-releases belonging to workspaces that are the workspace line's children.
This guarantees that a user with the ability to view a roll-up release can also view all of the sub-releases under that roll-up release.
However, the roll-up release can be associated with any level in the workspace line hierarchy. So, if you have (or add) another workspace line grouping together with other workspace lines, you can have a roll-up release that spans all of your workspaces.
Manage roll-up releases
The Releases tab in your navigation includes three different ways to manage your roll-up releases. Depending on your workspace type, some of these are disabled until you customize your navigation to show them. The available pages are:
Gantt: A Gantt chart of your roll-up or sub-releases. At the sub-release level you can organize your work in this view by releases or by epics.
Calendar: A calendar-based view of your work. Calendars can be built around initiatives, releases, release phases, epics, features, and to-dos.
Details: The detail view of your roll-up release, where you can see the structure of your release at a glance.
Retrospective: The retrospective report for past releases.
To switch between your views, you can of course use the navigation bar at the top of your page. However, if you have used filters to focus your view, use the Change view type dropdown to switch between several common views, while retaining any filters you have added yourself.
Filters you add yourself will transfer to a new view. Page filters — filters associated with the original view that cannot be removed — will not appear on the new view.
Your View type options are:
Gantt: The gantt chart view of your work.
Details: The details view of your work.
Calendar: The calendar view of your work.
Ship a roll-up release
A roll-up release can have multiple sub-releases, which each might ship independently. For this reason, shipping a roll-up release does not ship child sub-releases.
To ship a roll-up release, first ship the child sub-releases as their work completes. Then ship the roll-up release itself.