Suite overview
Introduction
Settings
Workspaces and teams
Knowledge
Reports
Collaboration
The Aha! text editor
Comments
Create Aha! record links
History
Notifications
How to use @ and # mentions
Saved views
Search
The My work page
To-dos
Watchers
Customizations
Aha! Roadmaps
Aha! Ideas
Aha! Whiteboards
Aha! Develop
Videos
Release notes


Comments
Every major record type in your Aha! account includes a comments section. You can use it to create the perfect message by including tables, adding attachments, and reacting with emojis.
You can even go a step further and comment inline on text or images.
User permissions
Aha! Roadmaps
Aha! Ideas
Aha! Develop
Click any of the following links to skip ahead:
Comment user permissions
Add a comment
Add an emoji reaction
Add attachments
Add comments directly to images
Add in-line comments to notes
Add in-line comments to whiteboards
Manage comment notifications
Inline comments and integrations
Comment user permissions
To interact with the comments section on a record type, you must have the following user permissions.
Viewer
Reviewer
Contributor
Workspace / Team owner
Administrator, account permissions
View comments
X
X
X
X
X
View inline comments that @mention them specifically
X
X
X
X
X
Create comments
X
X
X
X
Add emoji reactions
X
X
X
X
Create or resolve inline comments
X
X
X
X
Add a public comment to an idea
X
X
X
Edit another user's comment
X
Top
Add a comment
To add the first comment on a record, click the Comments tab on almost any record in your Aha! account, then click Add comment.
To add a comment to an existing thread, begin writing your comment in the text box at the bottom of the thread.
Customize your message using the tools located in the toolbar. To learn more about editing text using the toolbar, check out our support article on the Aha! text editor.
Comments can be edited and deleted. To edit a comment, hover over the comment until the text box is highlighted. Click the text box to begin editing the comment. To delete a comment, click the Delete link in the comment header.
To directly reach out to a fellow Aha! account user in a comment, you can type the @ key followed by the user’s name. This will send a notification to the user with your comment. You can also link to an Aha! account record by typing the # key followed by the first few characters of the record.
Top
Add an emoji reaction
Emoji reactions are used for a more visual and fun collaboration experience that encourages lightweight feedback.
To add an emoji reaction, click the Add emoji icon on a comment and choose an emoji. If another user has already added an emoji that you agree with, click the emoji to increase the reaction count. To see the names of users who reacted, hover over an emoji.
For example, you might add a trophy or a checkered flag to celebrate a new feature. Show gratitude for your team with a thumbs up or raised hands emoji. Or just add a simple smile emoji to indicate that you acknowledge and appreciate a comment from one of your teammates.
Top
Add attachments
To add an attachment to your comment, click Attach files and select the file you wish to attach. You can choose files from your local machine or select from one of our file storage integration options (Box, Dropbox, Google Drive, or Microsoft OneDrive).
If your Aha! account was created before February 1, 2023, you can also click Create mockup to add a customized mockup to your comments.
You can convert a comment attachment into a record attachment by clicking the star icon that appears in the top-left corner of the attachment thumbnail image.
Top
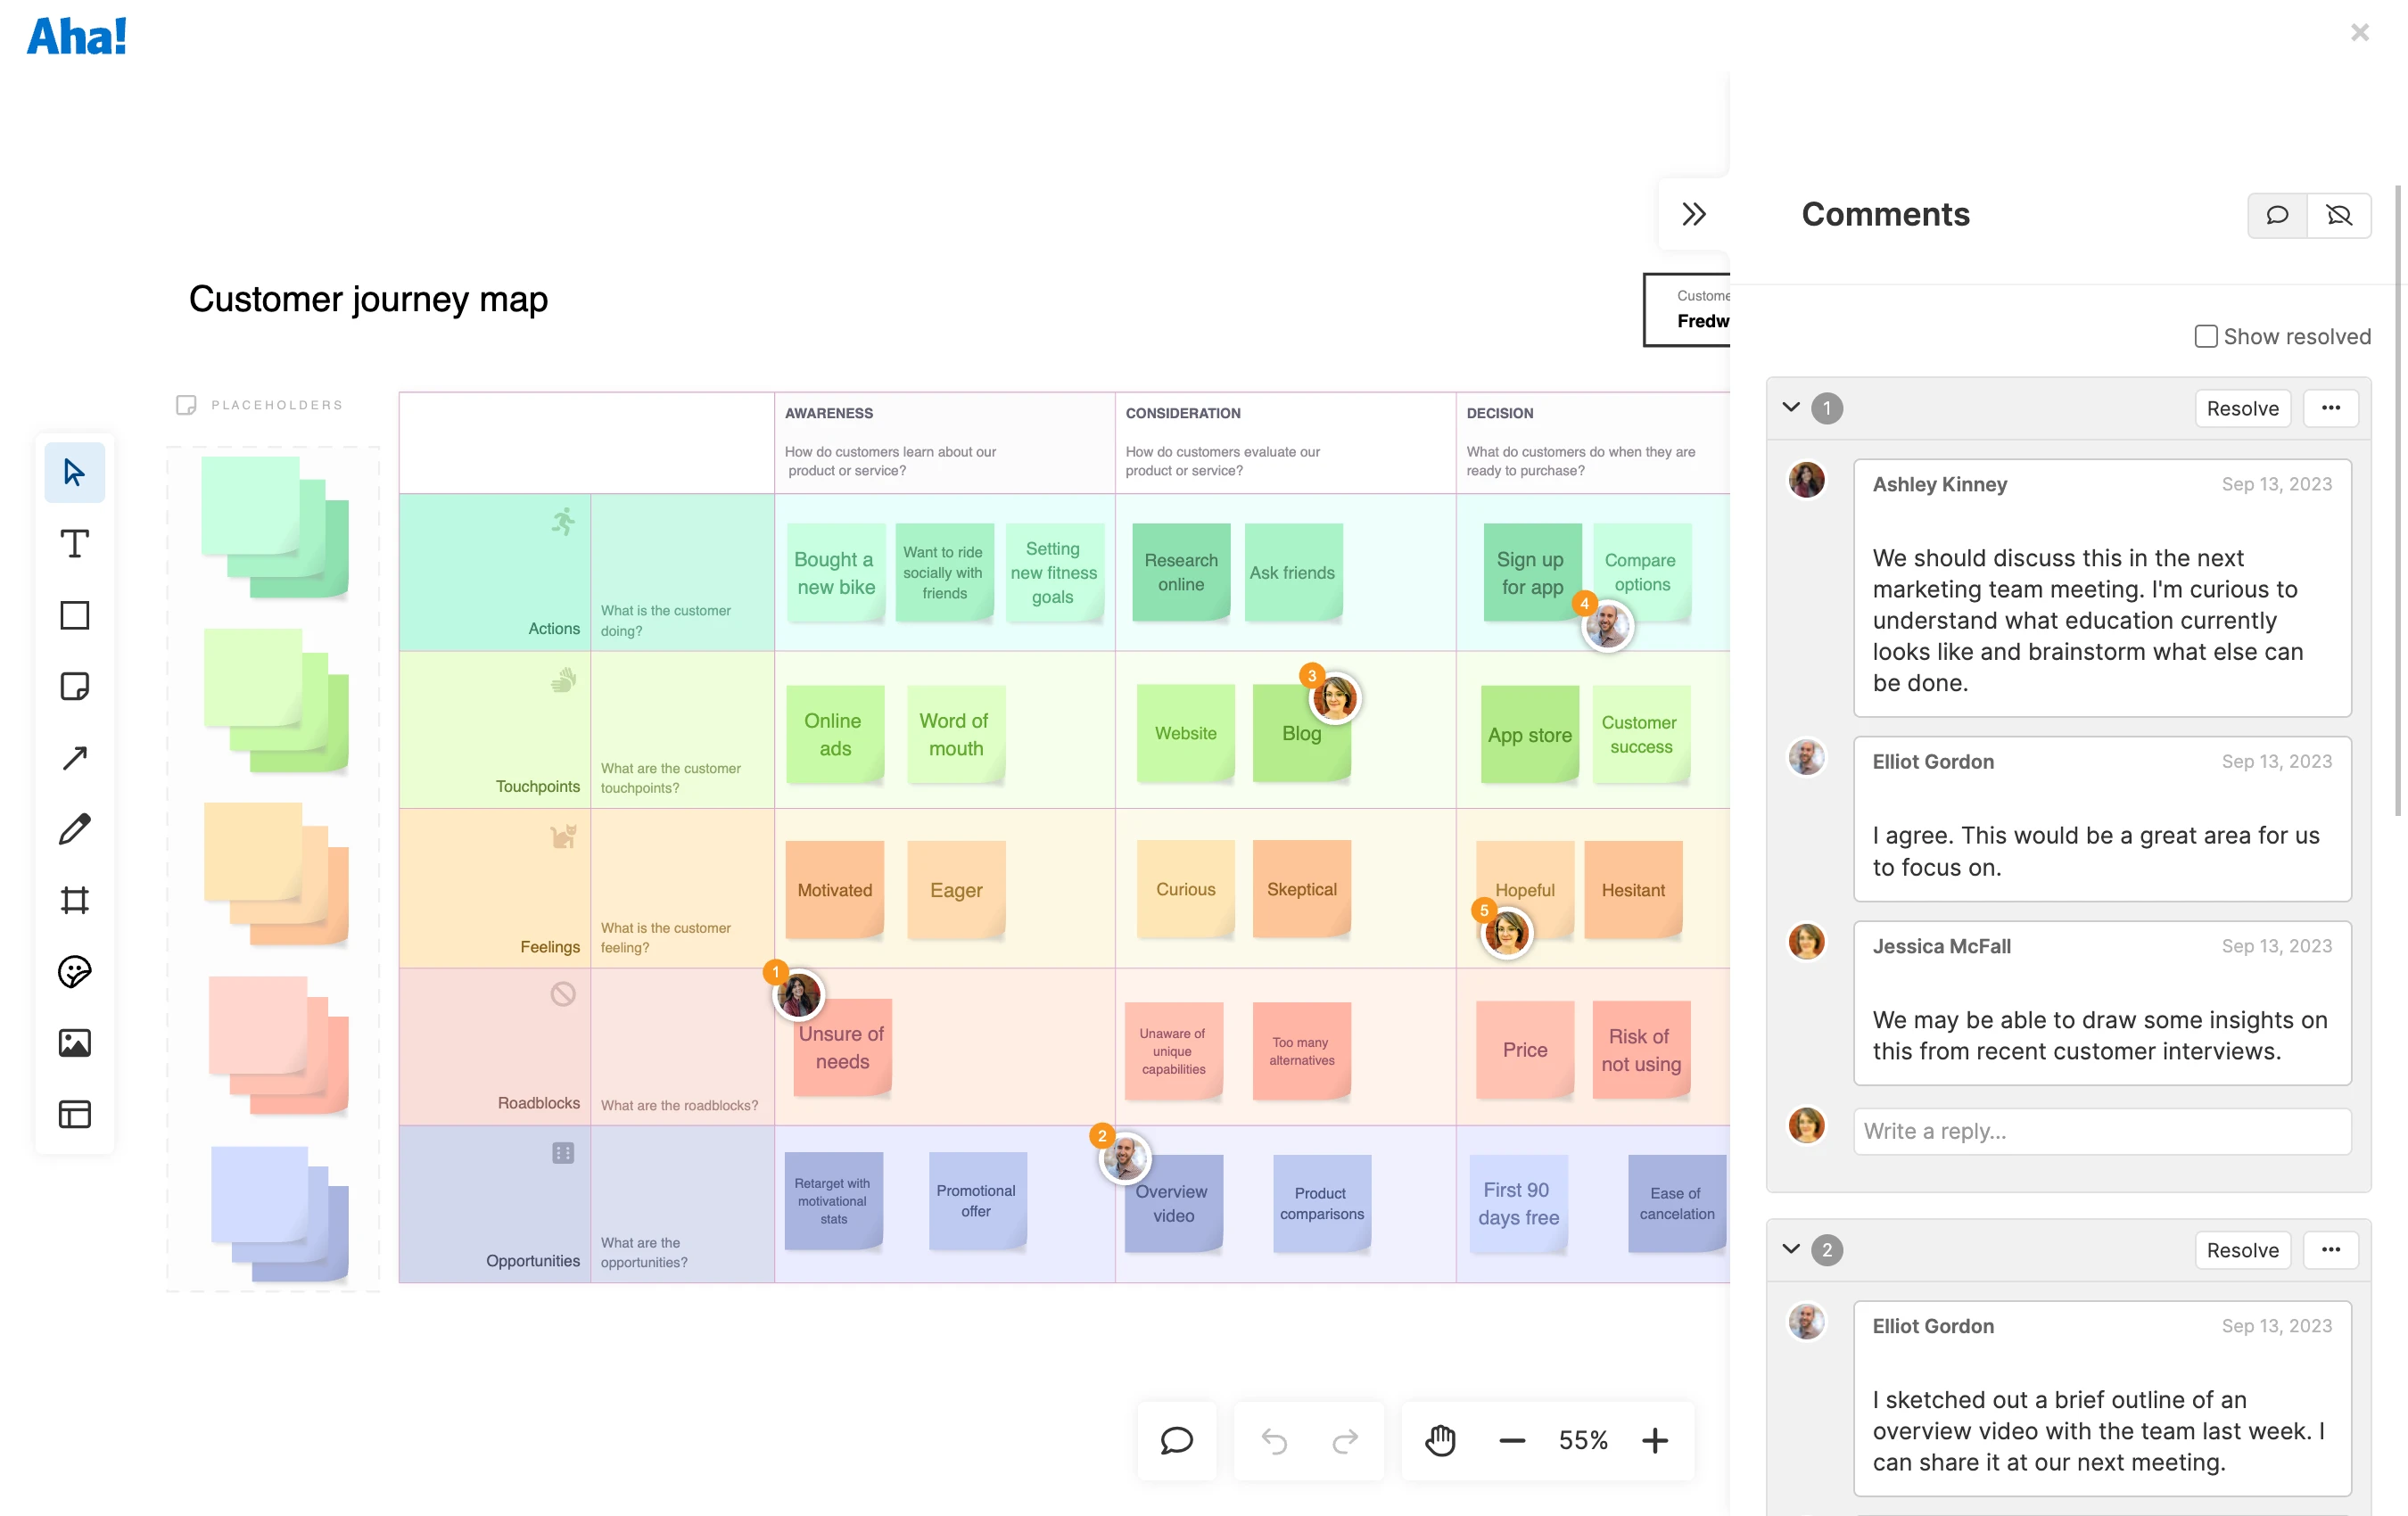
Add comments directly to images
Leave precise feedback by commenting directly on the image attachments. Users can reply to these comments, keeping the conversation organized around specific points on the image.
Image files need to be .png, .jpg, or .gif.
To comment on an image:
Open an attachment and click the View and add comments icon located on the top of the image preview modal.
Click anywhere on the attachment to start a conversation — clicking on the image will add a numbered orange dot to the location of your comment. Add your first comment to start a conversation and click Save comment.
When the reason for your conversation has been addressed and/or sufficiently discussed, click the Resolve button located on the header of the conversation. When you resolve a conversation, the color of the numbered dot changes from orange to green. Comments are still accessible after a conversation has been resolved.
The count that appears on the View or add comments icon and the attachment preview icon indicates the number of unresolved conversations on your attachment.
If you created your Aha! account before February 1, 2023, you can also comment on mockups. The comments will remain on the attachment as changes are made to the mockup.
Top
Add in-line comments to notes
The most effective way to leave feedback on text? Comment inline and start a conversation thread. Much like the ability to add comments to images, you can use inline comments on text to focus collaboration.
You need to be an owner or contributor to add or resolve inline text comments. Viewers can see comments that @mention them specifically, but they cannot respond to or resolve them.
You can comment inline on any text in a note, note custom field, the cell of a table, or any text in a record's description field. You cannot inline comment on the text in comments, or a record's create modal.
To create a new inline comment, highlight the text you want to comment on and click the comment icon that appears on the right side of the text editor. Your text will be highlighted and underlined in orange, the Comments side panel will appear, and you can start creating your comment. Click Save comment once you are done.
When your note is in full-screen mode, you can click >> to open the side panel at any time and view a note's existing comments.
Inline comments have access to the full text editor, so feel free to format your text, @ and #mention Aha! users and records, add and color tables, or insert images.
Click Resolve to resolve your comment. Resolved comments disappear from the list of comments unless you choose to show them by checking the Show resolved checkbox. (You can hide them again by unchecking that box.) If you choose to show resolved comments, text highlighted and underlined in green will indicate a resolved comment, and you will see a collapsed list of resolved comments in the Comments sidebar. If you reply to a resolved comment, it will become unresolved again.
Through the More options button, you can also Copy or Delete your comment.
Top
Add in-line comments to whiteboards
Adding comments to your whiteboard can provide an avenue for team members and stakeholders to share their thoughts, provide feedback, and engage in thoughtful discussions — strengthening asynchronous collaboration. Add comments to individual objects to add feedback about something specific, or add comments to a general area of a whiteboard to weigh in on broader themes.
Select the Comment icon at the bottom of your screen and click anywhere on your whiteboard to start a conversation. This will add a numbered orange dot to the location of your comment. Use the text editor to type out your first comment to start a conversation and click Save comment. You can also add a comment to a specific object on your whiteboard by selecting the object and clicking the Comment icon in its toolbar.
Comments will appear in numbered order in the right sidebar of your whiteboard. You can turn a comment into a threaded conversation by replying to it.
When your conversation has been addressed or sufficiently discussed, click the Resolve button located on the header of the conversation. When a comment is resolved, the color of the numbered dot will change from orange to green.
View comments
Users accessing your whiteboard from guest accounts will not see or be able to add comments to your whiteboard.
Anyone with access to your whiteboard can view the comments that users have added to it. Reviewers with Edit access to your document can add and respond to comments. Guests with View and Comment access to your document can also add and respond to comments. Comments will appear in the sidebar on the right of your screen. It will be collapsed by default — but you can click the << icon to open it. If there are unresolved comments on your whiteboard, a Comment icon with an orange dot will show here as well.
All unresolved comments will appear in the sidebar. Check the box next to Show resolved in your Comments side panel to show all resolved comments.
Click a comment in the Comments sidebar to navigate to the area of it the whiteboard it is added to. Likewise, click an orange numbered dot on your whiteboard to navigate to its corresponding comment in the Comments sidebar.
More options
Comments are a great way to start a conversation — and sometimes they are worth sharing individually. The More options menu on each comment enables you to do a few useful actions:
Cut objects cuts the comment so it can be repasted elsewhere on your whiteboard.
Paste objects pastes a comment you have previously cut from another area of your whiteboard.
Copy link to object copies a directly link to your comment that you can share with someone. When they click it, it will direct them to the area of the whiteboard that where the comment is added.
Group objects groups comments when you have multiple comments selected.
Ungroup objects ungroups comments that have been previously grouped.
Lock will lock a comment to your whiteboard or an object so it cannot be moved.
Delete will remove a comment completely.
Top
Manage comment notifications
Comment notifications work a little differently depending on what type of comment you leave. For comments that are not inline comments:
When you add a comment, you are automatically added as a subscriber to the comment thread and a watcher on the record. As a subscriber, you will be notified of any comments that are made on the thread. To add or remove yourself as a subscriber, you can click the Subscribe / Unsubscribe button in the bottom corner of the comment thread. You can also add or remove yourself as a watcher. Notifications for subscribers can be further customized at Settings ⚙️ Personal Notification preferences.
When you @mention someone in a comment, the user you mention in the comment will receive a notification and become a subscriber on the comment thread.
If an administrator edits someone’s comment, notifications will be sent to users watching the record or subscribed to the comment stream.
When you add an emoji reaction to a comment, no notification is sent. Emoji reactions are also not logged in the history of a record.
Inline comment notifications work just like notifications throughout your Aha! account — if a user creates, is @mentioned, or interacts with an inline comment thread, they are notified about changes to that comment thread. If a user is a watcher on the record where comments are taking place, then they are notified about all changes to comments on that record.
Top
Inline comments and integrations
Inline comments on text are wonderful — but can cause difficulty when you try to send inline comments from your Aha! account through an integration to a tool that does not have the UI to display those comments. To avoid this problem, your Aha! account will instead send a link to the Aha! inline text comment to the integrated tool. Users who click that link will be taken back to the comment in the Aha! account.
You can send links to inline text comments from your Aha! account to any tool with a 2.0 integration. Please see this article if you are still using a 1.0 integration and would like to convert it to a 2.0 version.
Top