Custom layouts
Custom layouts help you define the information that you want your teammates to see at two important times: when they create a record and when they view a record's details.
You can customize a record's layouts in two ways:
Use the Record create layout to ensure that the correct data is captured when a record is first created.
Use the Record view layout to choose how data is presented in the record's Details and Drawer views. In both Record view layouts, you can rearrange the tabs as well as the fields on a record.
Click any of the following links to skip ahead:
Permissions
Action | User permissions | Further reading |
Create, customize, and manage custom layouts | All products
| |
Select custom layouts for a workspace or team | Aha! Roadmaps and Aha! Ideas
Aha! Develop
|
Create a custom layout
Each record type in your Aha! account comes with a default layout of standard fields. If you want to customize the layout of a record's fields or tabs, create a custom layout and apply that to your workspace or team.
There are two ways to create a custom layout (or adjust an existing one):
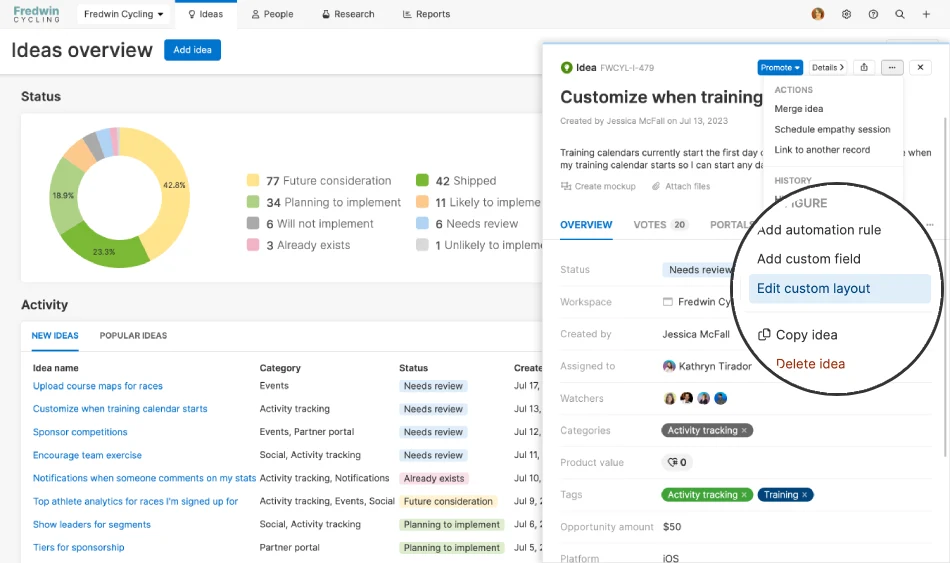
On the More options button of an individual record, select Create new custom layout or Edit custom layout. Either option will open the Custom layout builder.
Navigate to Settings ⚙️ Account Custom layouts. Select the record type you would like to customize, then click Add custom layout or hover over a layout that you wish to Edit. Either option will open the Custom layout builder.
With the Custom layout builder open, start by giving your custom layout a name. Each record has two layouts — the Record create layout and the Record view layout. We will go over these individually in the following sections.
Customize a record's create layout
Use the Layouts dropdown at the top-left corner of the Custom layout builder to select the Record create layout. This layout is what users will see when they create a record of this type, so you often want to focus this layout around the information you need to capture first.
Let's work through this layout builder from left to right.
The Fields list on the left shows all available standard and custom fields that you can add to your layout.
You will see an example record in the center of the page, with a few default fields to get your layout started. Most record types have several fields (like Name or Type) that are standard and cannot be removed or rearranged. But everything else is up to you!
Drag standard or custom fields from the Fields list to your record create layout.
Click the X by a field in the layout (where available) to remove it from the layout.
Drag fields in your layout vertically to rearrange them.
Check the box by Required to require a field. If this box is checked, users will not be able to create that record type if the required field is empty.
Required fields are only required for records created using this layout. Your Aha! account does not enforce these requirements for records that are created from integrations, CSV import, the Aha! mobile app, or the Aha! REST API. Also, after the record is created, data can be removed or edited in those required fields — they are only a requirement to create the record.
If you realize that you want to create a new custom field while you are customizing a record's Create layout, use the Layouts dropdown to switch to the View layout. There, you can create a custom field or navigate to Settings ⚙️ Account Custom fields to create one.
Customize a record's view layout
Remember, users will see a record's Record view layout after it has been created. Access a record either in its full-page Details view or in a pop-out Drawer view while on another page. To start customizing the Record view layout, use the Layouts dropdown in the top-left corner of the Custom layout builder to switch to it.
Once applied to custom workflows, Record view layouts appear in every stage of a record's lifecycle.
Enterprise+ customers can take this one step further with advanced custom layouts.
You can adjust a Record view layout by adjusting its fields or its tabs.
Adjust layout fields
The Fields list on the left shows you all available Existing custom fields that you can add to your layout — with a search bar to help you sort through the list. If you realize at this point that you want to create a New custom field, you can do that as well. In either case, drag the field you want to add over to your layout. If you are creating a new field, you will be asked to name it and provide any other details relevant to that custom field.
Is your list of existing custom fields full of discarded and duplicate fields? In Settings ⚙️ Account Custom fields you can merge duplicate fields together or convert a custom field from one type to another.
You will see an example record in the center of the page, with a few default fields to get your layout started. First, configure the fields you see in the Overview tab.
Add fields: Drag standard or custom fields from the Fields list to your record layout to add them. Or drag them off the record layout to remove them.
Remove fields: Click the More options button beside a field and select Remove from layout to remove it. Note: Some fields, such as Type or Status, cannot be removed from a layout.
Rearrange fields: Drag fields in your layout vertically to rearrange them.
Adjust field visibility: When users open a record after it has been created, they can sometimes see a lot of fields in the Overview tab. Use the More options button beside each field to decide whether that field should be Always shown when a user first opens the record, Hidden, or (where available) Hidden if empty. Users can always expand a record's layout to show a full list of fields, so you want to make sure that the fields most commonly used in your record workflow are always shown.
The Ideas portal layout, available to Aha! Ideas and Aha! Roadmaps customers, does not include the ability to adjust field visibility. Fields in an Ideas portal layout will not appear if they are empty.
Mark fields read-only: Use the More options button beside a field to mark it read-only.
Edit custom fields: If you need to adjust a custom field that you added, click the More options button beside the field and select Edit custom field.
Adjust layout tabs
Next, configure the tabs arrangement of a record's layout. Rather than list all information at once, most Aha! record types break out relevant information into tabs. Usually, you'll see a Description of the record, Overview of its fields, Comments, To-dos, Related records, and the record's History. Depending on the record type, Aha! product, or integrations you have enabled, you might also see child record types (such as Phases or Requirements), product-specific tabs (such as the Research tab) or integration-specific tabs (such as Figma).
By default, a record's Overview will be the first tab in the details view and a collapsible column on the right side of the drawer view. A record's Description or Theme defaults to a location above the other tabs, so you can read a summary of a record and then see fields that relate to it. However, you can change these defaults in custom layouts.
Click and drag tabs to rearrange their order.
You can move the Description tab out of the top position if you like. If you do this, your record layout will have nothing in the top position.
The Details view of a record layout includes a right sidebar. By default, the Overview tab takes this position, but you can move any tab into that sidebar. You can also choose not to place a tab here and have a layout without a sidebar.
A custom layout can show several tabs side-by-side, depending on the size of your browser window. The More tab is an overflow space where tabs beyond what your browser window can show appear. Use the More tab in the layout builder to select which tabs should be hidden behind the More tab if a user's browser window cannot fit all the tabs in one view.
Finished? Great! Look to the top-right corner.
If this is an existing layout applied to a workspace or team, hover over the Impacts link to see what records your changes to this layout will affect — then click into any workspace or team to see more.
Multiple workspaces or teams can use the same custom layout — but the individual workspace or team settings (like capacity planning) or integrations might affect the fields and tabs that appear in that workspace or team when using a custom layout.
Use the view toggle to switch between the Record view layout's Drawer and Details views.
Click Cancel to cancel your changes.
Click Save layout to save your layout.
Mark fields read-only
Custom layouts highlight critical information through fields and tabs — but sometimes you do not want your team to update that information. For example, a layout might include feature development estimates that product managers should not adjust, initiatives that are approved contingent on specific budgets, or a large organization's idea priority.
Read-only fields block anyone from updating the field through a record's drawer or details view, so that users in your Aha! account have the proper context but cannot accidentally adjust fields that need to stay static.
Read-only fields are not locked fields, however. They can still be updated through several pathways: the Aha! API, through an integration, through bulk edits in list reports, and through clicking and dragging records in Aha! Roadmaps Gantt charts and roadmaps. This is often the key to read-only fields' true value: the right people can update them, and everyone can benefit from their information.
To mark a field as read-only, click the More options button in a record's View layout, and select Read-only. Once you Save your layout, the field you marked read-only will be immediately uneditable through the record's detail or drawer view.
Apply custom layouts to your workspace or team
To apply an existing custom layout to your workspace or team, navigate to Settings ⚙️ Workspace / Team Configure Custom layouts. Select the layout you want to use for a particular record type and, for Aha! Roadmaps customers, whether it should inherit a layout from a particular workspace line. This is useful for driving layout consistency across your hierarchy. Assigning layouts here to a record type will assign both the record create layout and the record view layout for that record type.
Note: A record will only display the custom fields that are included in the Record view layout of the workspace or team where the record resides. For example, you could create a feature in Workspace A and then move it to a release for Workspace B, which uses a different layout. For the same data to be visible in Workspace B, the layout for Workspace B must include the same custom fields that were defined in Workspace A.