This article refers to releases and features. Depending on your workspace type, you may see "schedules" and “activities" in your workspace.
Aha! Roadmaps | Introduction to features
Features are the fundamental units of work. They represent everything that has to be done to achieve your strategic vision, and because you can link them directly to strategic goals, initiatives, and other records in your workspace or workspace line, everyone who works on your features will have full context into why the feature matters and how they are contributing to your strategy.
Add your features to a release (a container for work organized around a release date) or an epic (a container for work organized around a theme). Then define your features with descriptions, requirements, attachments, and whiteboards that articulate the exact challenge that you are trying to solve.
As your features progress through their workflow, the epics and requirements linked to them can stay in sync. You can enable workflow status syncing between epics and features, features and requirements, or both in your workspace settings.
Once defined, your features are ready to assign and share with your teams, either within Aha! Roadmaps or through one of our many integrations. If you choose a tool with a two-way integration, then you can send features over an integration to another team and receive status, progress, and data updates back.
Click any of the following links to skip ahead:
Create features
There are many ways to create feature cards in Aha! Roadmaps, including directly in releases and roadmaps and by importing them from a development tool.

To start, we will focus on some of the most common ways to create features.
The simplest way is to click the + icon in the top-right corner of any page. From there, click Feature and complete the Create feature modal with all necessary information.
The second way is to navigate to the Features tab and click the Add feature button — either at the top of the page or at the bottom of each release column. The same Create feature modal will appear. Add all the details you need.
The third way to create a feature is to promote it from an idea in your ideas portal. Sometimes stakeholder ideas are important enough to promote straight to a feature. Aha! Roadmaps allows you to do that at the click of a button.
Once you have created a feature, you will see a green box containing a hyperlink to your new feature inside. Click it to see the detail drawer for your feature and adjust or add any details. Click the X icon to close the detail drawer or the Details button to see full-page feature details.
You can configure features further by adding information to them or by opening a feature's detail drawer and selecting the More options button.
Add to initiative to link your feature to an initiative.
Add to release phase to add your feature to a release phase.
Link to another record to create a record link.
Create related idea to create a linked idea with your choice of idea's visibility.
Convert to initiative to convert your feature to an initiative. Your feature might have looked like a single item to complete but is actually substantial enough to upgrade to an initiative. This option lets you convert it. Note: Converting records may cause them to lose information.
Convert to epic to convert your feature to an epic. Epics are useful for organizing features by theme. If your feature has expanded in scope, particularly if you notice that its child requirements could each be features in their own right, you may wish to convert it to an epic. Note: Converting records may cause them to lose information.
Convert to requirement to convert your feature to a requirement. Sometimes your feature doesn't expand in scope; it shrinks. If your feature would be better suited as a requirement of another feature, use this option to convert it. Note: Converting records may cause them to lose information.
Time tracking history breaks down the estimates and time tracking applied to your feature.
Use requirements estimates generates an effort estimate for your feature based on the individual estimates of its child requirements.
History shows you an audit log of changes made to the feature.
Add/Delete progress field adds or deletes a progress field to your feature. You choose from several different methods for calculating your feature's completion progress and visualize its progress in roadmaps.
You can set default progress calculation methods at the workspace level, and even inherit defaults from workspace lines.
Add custom field adds a custom field to your feature layout. You can also create custom fields in Settings ⚙️ Account Custom fields, of course. But this option is useful for times when you realize you need to add a custom field but do not want to leave the page and lose context.
Edit custom field layout pulls up the feature layout, which lets you add, remove, or rearrange existing custom fields. Again, you could edit your feature's layout in Settings ⚙️ Account Custom layouts, but this option lets you edit your feature layout without leaving the feature itself. Note: This option will only appear in the More options dropdown if you have added custom fields to a layout to create a custom layout.
Add automation rule takes you to Settings ⚙️ Workspace Automation, where you can add a new automation rule. Automation rules, available to Enterprise+ customers, are useful for streamlining your workflows and driving consistency across your workspace. Note: This option will only appear in the More options dropdown for Enterprise+ customers.
Copy feature copies your feature, including requirements, to-dos, and to-do assignees (but without to-do due dates).
Delete feature deletes your feature.
Manage features
The Features tab in your navigation includes four different ways to manage your features and epics. Depending on your workspace type, some of these are disabled until you customize your navigation to show them. The available pages are:
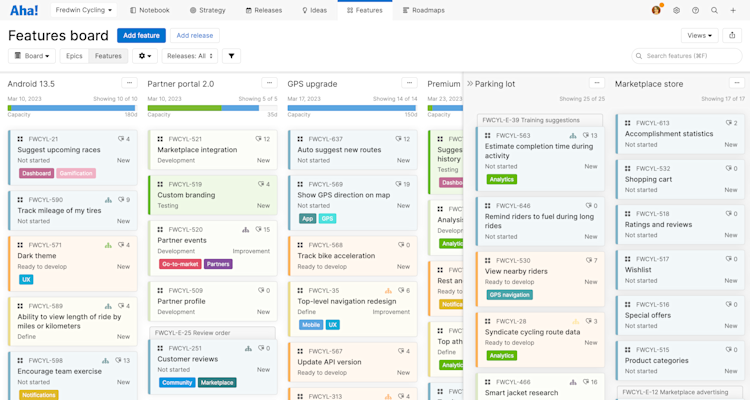
Board: A view of all your features and epics across all your releases and parking lots.
Details: The details view of features and epics in a given release.
Prioritization: A view to help you group, rank, and score features by product value.
User story map: A view of how your work affects your user's journey.
Workflow: A kanban-style view of your initiatives, epics, features, and requirements.
To switch between your views, you can use the navigation bar at the top of your page. However, if you have used filters to focus your view, use the Change view type dropdown to switch between several common views while retaining any filters you have added.
Filters you add yourself will transfer to a new view. Page filters — filters associated with the original view that cannot be removed — will not appear on the new view.
Your View type options are:
Board: A view of all your features and epics across all your releases and parking lots.
Workflow: A kanban-style view of your initiatives, epics, features, and requirements.
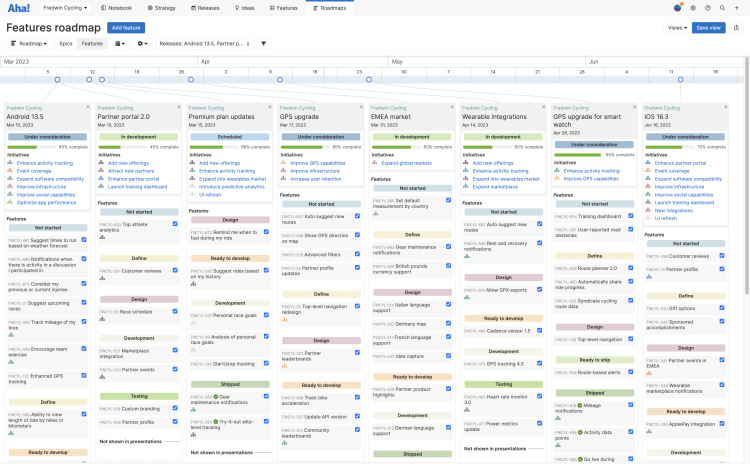
Roadmap: The features roadmap is one of the most useful ways to visualize the progress of your features and epics.
Let's focus on the two most commonly used views to manage features and epics: the features board and the features detail views.
The Features Board page shows features and their associated releases. Features can be rearranged into a priority order within a release by dragging them to their desired position.
To find specific features, you have two search options.
Use the in-page search bar to filter your board to only view specific features. Do this by searching for feature cards that include the text of your search terms in their Name, ID, or any fields visible on the card.
Run an account-level search while you are on the features board. Enter your search terms, then click into the Features board tab to see the relevant results from your features board.
The Features Details page displays one feature at a time, allowing you to see every detail at a glance and a collapsible list of other features in the same release to the left.
The Features Details page is hidden by default for new Aha! Roadmaps accounts. If you would like to enable it, you can do so by customizing your menu navigation.
You may find it useful to break down the work being done in a feature even further, using to-dos, comments, and requirements.
Requirements are a versatile Aha! Roadmaps record type. They can represent a subset of the work to be done, such as research, design, or peer review. They can also be promoted to features themselves. Requirements can be assigned to members of your team, and you can comment on them as well — keeping the conversation on your feature much more organized. Click the Requirements tab, then click Add to create one. Note: You can also sync workflow statuses between requirements and their features, so that as requirements' statuses change, their features will stay synced to the appropriate status category.
Comments allow you to collaborate on a single feature without losing track of the conversation. Anyone on your team can comment on a feature by clicking the Comments tab, then clicking Add comment. Type the @ key to tag members of your team and the # key to link another Aha! Roadmaps record.
To-dos are as simple as they sound. They allow you to assign a piece of a feature to one or several people. Click the To-dos tab on a feature card, then click Add to-do to create one. Then, describe it and assign it to a member of your team.
Enterprise+ customers can enable a special type of to-do, called a work request, to track cross-functional work across teams.
Organize customer research
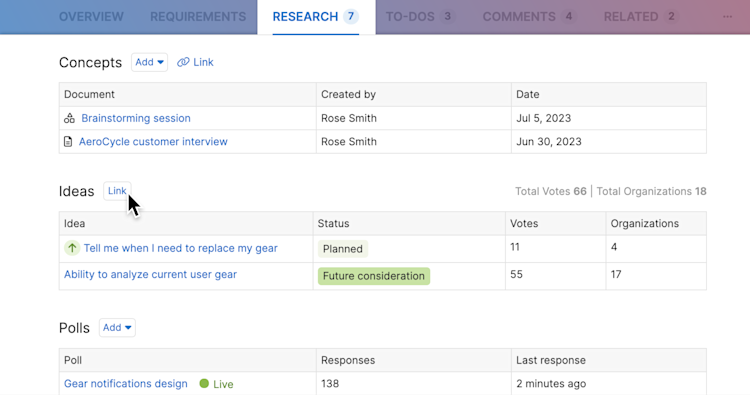
To define exactly what your customers want, you need to be able to gather all of your research — including customer interview notes, related ideas, and polls — in one place. The Research tab (included on all features, epics, releases, and initiatives) brings all this information together.

You may need to click the More options button to view the Research tab. You can customize your record layout to change the tabs' order.
This tab is organized into three sections.
Use the Concept section to link related notes and whiteboards, making it easy to find customer interviews, market research, user flow diagrams, and more.
Under Ideas, you can view promoted ideas, as well as any other requests that are useful to reference.
The Perspectives section is where you can create and manage polls, empathy sessions, and in-app feedback. (This functionality is included in the Aha! Ideas Advanced plan.)
Customize features
Features can be customized to ensure that you are only seeing information on your features that is relevant to your business.
Here are a few customization options for features:
Create custom fields that fit your workspace's needs, like expected ROI.
Customize the feature card field layout so that the most relevant fields show up where you need them to.
Customize the feature card design for yourself or for your team.
Customize the Aha! Roadmaps score so that you can more easily prioritize features in a release.
Report on features
Reporting on features allows you to collaborate with your team, inform internal stakeholders of your team's progress, and visualize the work you are doing to reach your strategic goals.

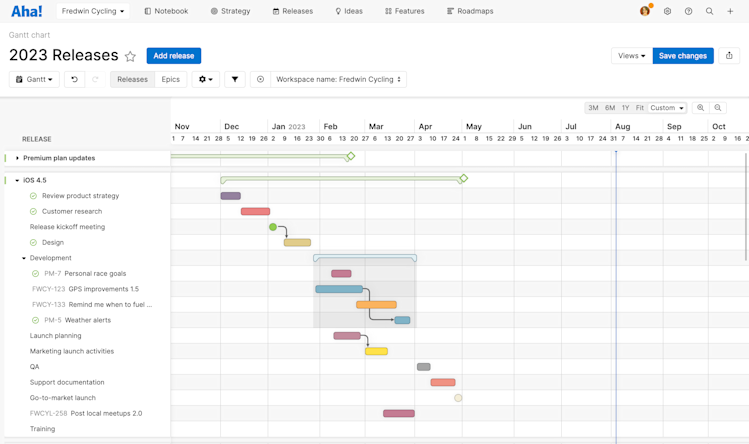
Use the Gantt view to visualize the features that contribute to epics and releases.
Use roadmaps like the features roadmap or the now, next, later roadmap to visualize and present on your strategy.
Use analytics to dig deeper into the data that your features provide.
Use any page, roadmap, or analytical report you find in Aha! Roadmaps to create and share beautiful, insightful presentations.
