This article discusses functionality that is included in the Aha! Ideas Advanced plan. Please contact us if you would like a live demo or want to try using it in your account.
This article is part of a series on widgets:
Aha! Ideas | Community feedback widget (Advanced plan)
The community feedback widget is special. With a one-time installation on your site, you can start gathering your users' thoughts at a critical time — while they are using your application. Have multiple applications? No problem! Create separate feedback widgets for each application in Aha! Ideas, install the widgets, and start tracking feedback on multiple applications in one place.
Customers share feedback by participating in a community chat with each other and you. You can focus the conversation — maybe you want to talk about a specific page on your site or maybe you are thinking of introducing a new feature. You can customize the look of the feedback widget to match your company's brand. Back in your Aha! Ideas account, you can analyze all the feedback you have gathered.
There are two types of in-app widgets you can install in your application. This article focuses on the widget that lets you create a threaded chat conversation between you and your users, but you can also install an in-app ideas submission widget that lets your users submit ideas directly from your application.
Click any of the following links to skip ahead:
Install the community feedback widget
To use the community feedback widget, you first need to install a code snippet in your web application. This connects your application with your Aha! Ideas account and you only need to do it once. After the widget code is installed, that's it. You can create and enable widgets as needed by yourself in Aha! Ideas, show widgets on specific pages of your application, interact with your users, and analyze the feedback without any help from a developer.
The first-time installation will likely require the help of a developer. But do not worry — your Aha! Ideas account gives your developer the code snippet they need and we have created an installation guide to walk you through the process.
Add feedback widgets to your web application
With installation complete, it is time to start gathering feedback. We recommend that you use the community feedback widget for focused conversations. For example, configure a widget for on your application's billing pages to get your customers' feedback on the experience. Or create another widget for a specific report in your web application that you just significantly updated.

In Aha! Ideas, navigate to Empathy In-app feedback to get started. You will need to be a contributor or workspace owner to navigate to and create feedback widget records.
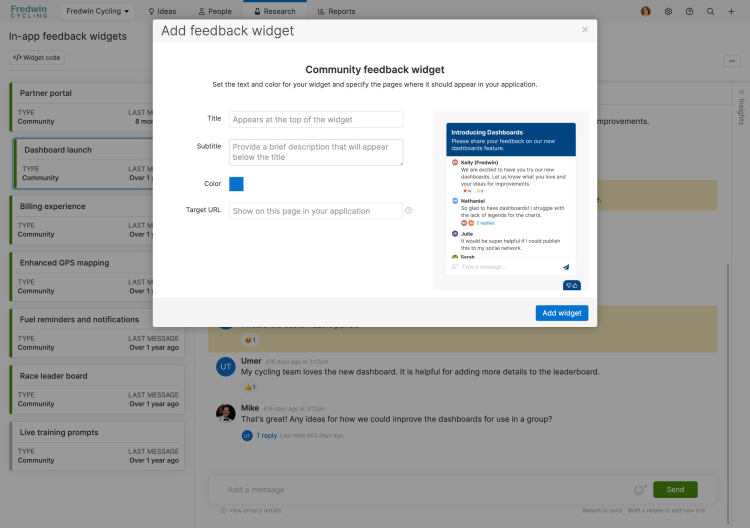
Click Add widget to add a new feedback widget. From the Add feedback widget modal, you get to customize the widget and specify the pages in your application where it should appear.
Title: Your users will see this title at the top of the widget. Give it a title that focuses the feedback on a particular topic, such as "Billing experience" or "Introducing the new pivot table."
Subtitle: Your users will see this subtitle under the title. Add a brief sentence explaining what you would like feedback on.
Color: Customize the widget with your brand color so that giving feedback is a familiar, branded experience for your users. Use a hex code here to enter a custom color.
Target URL: This is the page (or pages) on your web application where you would like the widget to appear. You can use an asterisk * for wildcards here. For example, if you enter "https://www.example.com/billing/*," the feedback widget will appear on every page in the /billing section of your site.
Click Add widget to start showing your widget on your Target URL. When you first add the widget, it is deactivated by default. You can click over to the Customizations tab and click the Active toggle if you want to check over the configuration first.
Customize your feedback widget
Now that you have added your widget, you can start collecting feedback immediately or you can customize it further. Let's walk through each of the tabs in the feedback widget details view.
While a Title and Subtitle appear on the widget for your users, the widget Name and Description at the top of your page in Aha! Ideas are internally facing.
Conversation
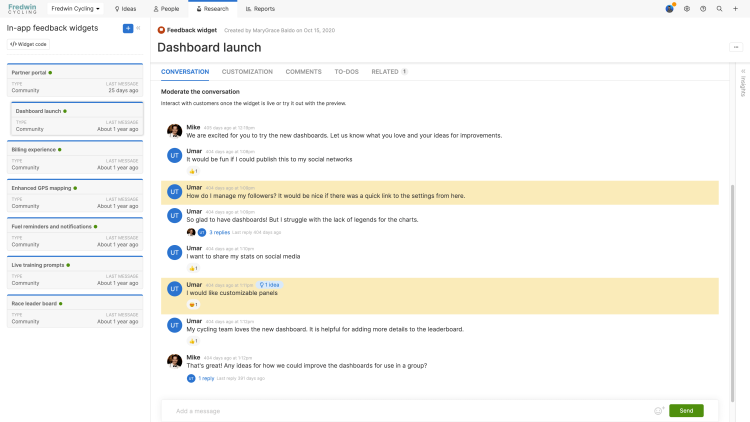
While your users leave feedback through the community feedback widget, you can engage with and moderate the conversation from this tab. You can view the entire conversation on this tab in Aha! Ideas without needing to open your web application. If a widget is targeted to show on multiple pages in your application, the same conversation is shown on all the pages and also here on the details page.
We will discuss feedback moderation in the next section below.
If you see a grey box on this tab titled Install the widget into your application to collect feedback, then your feedback widget is not being shown to your users. Check that the widget code has been installed properly, that the Target URLs are valid and that on the Customization tab that the widget is Active.
Customization
This tab includes settings for the widget's Visibility, Widget details, and Branding. You filled in some of these fields while adding the widget but there are others worth highlighting.
Visibility
Active: Control whether your feedback widget should appear on the pages you selected in your Target URLs. If you activate or deactivate your widget, those changes will happen in real time.
Target URLs: This is the page (or pages) in your web application where you would like this widget to appear. Remember, you can use an asterisk * for wildcards here. You can also use the delete icon to remove a target URL and the + icon to add a new one. We recommend adding a new widget for each feedback conversation you want to have with your customers. Show it on the pages where users are thinking about that topic. Before adding a new Target URL to a widget, make sure that page matches the title and conversation of the widget. If not, you may want to create a new widget and conversation for this page instead.
Application: If the widget code snippet has been installed in multiple applications, select which one should display this widget.
Viewer count: This is a count of the unique users who have visited your Target URLs and have opened the widget.
Message count: This is the number of messages from all users entered in this widget.
Watchers: Lists the watchers in Aha! Ideas for your feedback widget. Click the + button to add more watchers.
Widget details
Title: Your users will see this title at the top of the widget. Give your widget a title that focuses the feedback on a particular topic, such as "Billing experience" or "Introducing the new pivot table."
Subtitle: Your users will see this under the title. Add a brief sentence explaining what you would like feedback on.
Branding
Color: Customize the widget with your brand color so that giving feedback is a familiar, branded experience for your users. Use a hex code here to enter a custom color.
Accent color: Choose whether your feedback widget should have a light or dark text on top of the selected color.
Admin icon: If you choose to upload an admin icon, then Aha! Ideas users who leave feedback will show a small icon denoting them as administrators in the feedback widget. This helps to differentiate their responses from your customers' feedback. This is an optional step. Admin icons should be square and can be .png, .gif, or .ico.
Position: Choose the corner (Lower right or Lower left) on your site's page where the ideas submission widget should appear, or select Custom to install a custom trigger for your widget.
Preview: Click Preview a live widget to see how your widget will appear to your users. You can also preview your widget at any time by clicking the More options menu at the top right of your page, then click Open demo page.
Comments
Like any other record in Aha! Ideas, users in your Aha! Ideas account can comment on a feedback widget.
To-dos
Like any other record in Aha! ideas, users in your Aha! Ideas account can also assign each other to-dos related to a feedback widget. These can be related to the feedback widget's preparation or for insights you glean during the conversation.
Insights
On the right side of the feedback widget, you have a place to collect insights. This tab is where you list Learnings from the conversation and where you can review any messages you have Starred for later. Everything you star or write down here is only visible to you.
Moderate the feedback conversation
With your feedback widget added, customized, and activated, kick-off the conversation yourself by leaving the first message to welcome people. Then join in as people start to reply.
Once your users start leaving feedback, there are several things you can do. Hover over a user's message to interact with them.
Click the emoji icon to add a quick emoji reaction. Your users can do this, too.
Click the thread icon to add a threaded reply to the post. You can ask for more information or just share some encouragement. Your users can do this too.
Click the star icon to star a message. Starred messages are those you want to review later. They will appear with a yellow highlight in the session and will be listed in the Insights sidebar on the right. Your users cannot star messages or tell which messages you have starred.
Click the More options button to:
Edit a user's message.
Create a related idea right from their message.
Delete the user's message.
As you review and respond to feedback, click over to the Insights tab on the right. You can start taking notes in the Learnings section and review any messages you or your fellow Aha! Ideas users have starred.
Analyze insights
When you are ready to end the conversation, leave a message thanking your users for all their valuable feedback. Then navigate to the Customization tab and click the Active toggle to deactivate the widget.

First, scroll back through the conversation. Were there any threads you did not get a chance to follow? Any comments that received a lot of emoji reactions that you did not realize were so popular? Hover over any message to star it and view it in the Insights tab. You can also open up the Insights tab to take notes in the Learnings section of takeaways.
Click into the Insights tab at the right to see the Learnings and Starred messages that you have compiled. As you hover over a starred message, you can either click the # icon to review the message in context or click the lightbulb button to turn the message into a related idea.
Then, congratulations! You have completed a feedback widget conversation, built that feedback into your next round of ideas, and connected directly with your users. Any time you want to gather more feedback on a particular topic, just add a new feedback widget and start over.
Use feedback widgets in customer research
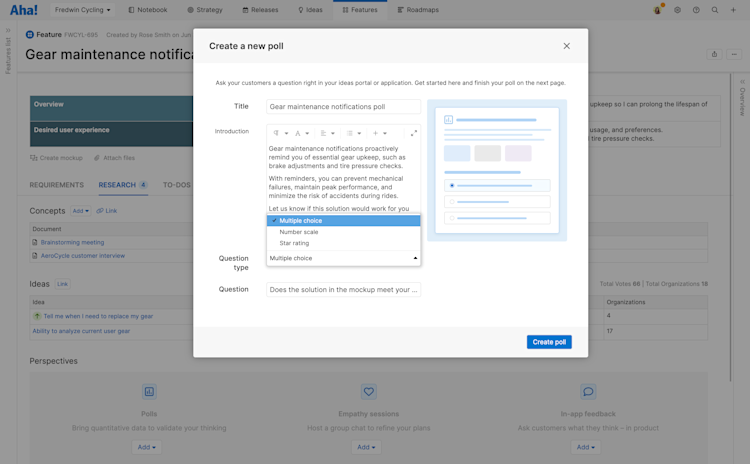
To define exactly what your customers want, you need to be able to gather all of your research — including customer interview notes, related ideas, and polls — in one place. The Research tab (included on all features, epics, releases, and initiatives) brings all this information together.

You may need to click the More options button to view the Research tab. You can customize your record layout to change the tabs' order.
This tab is organized into three sections.
Use the Concept section to link related notes and whiteboards, making it easy to find customer interviews, market research, user flow diagrams, and more.
Under Ideas, you can view promoted ideas, as well as any other requests that are useful to reference.
The Perspectives section is where you can create and manage polls, empathy sessions, and in-app feedback.
Troubleshooting
If a widget is not appearing as expected in your application, please check the following in Aha! Ideas:
On the widget's Customization tab:
Make sure it is Active.
Confirm the Target URLs (e.g. https://*.example.io/dashboard/*). Compare the Target URLs to an actual example URL where the widget should be displayed (e.g. https://customer.example.io/dashboard/123).
If you have created multiple Applications, confirm that the correct one is selected.
In the Widget code modal:
Check the Installation status field to see if any successful requests have been received from your installation.
In your application, make sure that the Widget code is installed on the pages with the Target URLs.
Go to a page where the community feedback widget is expected to display.
Open the browser developer tools.
Check the network tab:
Is there a request for
feedback.jsthat looks likehttps://cdn.aha.io/assets/feedback/feedback.js?If yes, look at the feedback request and check the response for an error.
If no, the Widget code has not been successfully installed for this page.
If you get stuck, please reach out to our Customer Success team. Our team is made up entirely of product experts and responds fast.