This article refers to releases and features. Depending on your workspace type, you may see "schedules" and “activities" in your workspace.
Aha! Roadmaps | Introduction to epics
Epics bridge the gap between strategic initiatives and individual features. Use them to break work down incrementally — define an initiative, separate it into key themes with epics, then build out features and requirements in more detail. As you deliver functionality over multiple releases, you can communicate how your team is progressing on large themes of work with epics.
Aha! Roadmaps comes with the tools to make epic analysis an integral part of your strategic planning. Manage your epics on the epics board, then visualize them on the Gantt chart in the context of features and epics — so you can see at a glance what you are delivering and when. Customize epics to match your team's ideal workflow, then send them to external tools using over 30 different integrations, so everyone can see how their work contributes to your strategic — and thematic — goals.
In this article we will walk through how to create, manage, and customize epics, as well as how to use them in reports and roadmaps.
Click any of the following links to skip ahead:
When to consider using epics
Your product team is agile and you are looking for epics to group your stories.
Your marketing team has large objectives that will take several schedules to complete. You need a way to track these epics and view them on a roadmap.
Your team currently uses strategic initiatives to group user stories but you would rather utilize initiatives for strategic themes and group user stories by epic instead.
Enable and configure epics
To enable epics for your workspace:
Navigate to Settings ⚙️ Workspace Configure Epics.
From there, you can select Enabled, Disabled, or Inherit from [workspace line].
The default value is Inherit from [workspace line], which means the setting is enabled or disabled based on the status of the Epics setting on the workspace line. Once enabled, you can begin adding epics.
To further customize epics:
Update the terminology from epics to any label that works better for your team.
Create custom statuses and workflows for epics on the Settings ⚙️ Account page, including custom templates for your epics. Note: You can also sync workflow statuses between epics and their features, so that as features' statuses change, their epics will stay synced to the appropriate status category.
Customize the epic card design. Just like features, epics have their own customizable card design. They can also be scored using the same custom scorecards that are used on features.
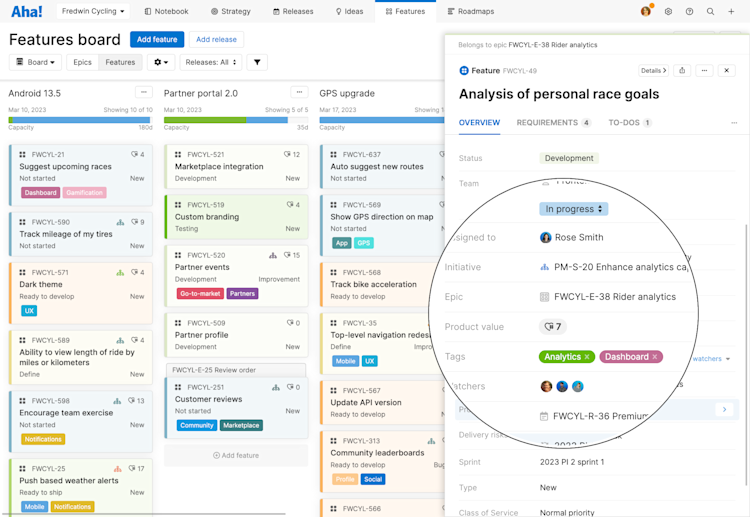
Customize feature card designs on the Features Board and Features Workflow pages to include epics. Once you do this, the epic name and reference ID will appear above a feature card that is linked to an epic.
Show epic labels on the Features Details page by enabling the Settings ⚙️ Workspace Configure Customize record cards Show epics setting.
Create epics
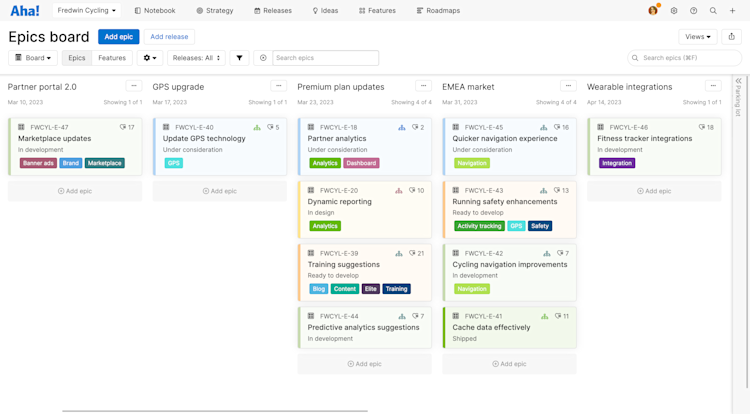
Once you have enabled epics, you can add and manage them from the Features Board or the Features Detail page. The toggle located on the features board in the upper-left corner switches between epics and features. When you toggle to epics, you can create a new epic by clicking Add epic or by clicking the More options button located next to each release name.
Epics have Date ranges (start and end dates), but because epics can have child records — features — you can choose to have an epic's dates Calculate from features. If you select this (or if a workspace owner has set this as the Record dates default setting), your epic's Start date will be the same as the earliest feature Start date and its Due date will be the same as the latest feature Due date. If a feature's dates change in such a way that it affects your epic's dates (even through an integration), your epic's dates will update automatically.
If an integration updates an epic's Start date or Due date, the calculation type will change back to Enter manually, and updates to child features' dates that you make in Aha! Roadmaps will not update the epic.
You can configure epics further by adding information to them or by opening an epic's detail drawer and selecting the More options button.
Add to initiative to link your epic to an initiative.
Link to another record to create a record link.
Create related idea to create a linked idea with your choice of idea's visibility.
Convert to initiative to convert your epic to an initiative. Epics and initiatives both organize large bodies of work, so it is not uncommon to discover that what you thought was a theme of work is substantial enough to upgrade to an initiative. Note: Converting records may cause them to lose information.
Time tracking history breaks down the estimates and time tracking applied to your epic.
Use features estimates generates an effort estimate for your epic based on the individual estimates of its child features.
History shows you an audit log of changes made to the epic.
Add/Delete progress field adds (or deletes) a progress field to your epic. You choose from several different methods for calculating your epic's completion progress and visualize its progress in roadmaps. Note: You can set default progress calculation methods at the workspace level, and even inherit defaults from workspace lines.
Add custom field adds a custom field to your epic layout. You can also create custom fields in Settings ⚙️ Account Custom fields. But this option is useful for times when you realize you need to add a custom field but do not want to leave the page and lose context.
Add automation rule takes you to Settings ⚙️ Workspace Automation, where you can add a new automation rule. Automation rules, available to Enterprise+ customers, are useful for streamlining your workflows and driving consistency across your workspace. Note: This option will only appear in the More options dropdown for Enterprise+ customers.
Edit custom field layout pulls up the epic layout, which lets you add, remove, or rearrange existing custom fields. Again, you could edit your epic's layout in Settings ⚙️ Account Custom layouts, but this option lets you edit your epic layout without leaving the epic itself. Note: This option will only appear in the More options dropdown if you have added custom fields to a layout to create a custom layout.
Copy epic copies your epic, including to-dos and to-do assignees (but without to-do due dates).
Delete epic deletes your epic.
Epics can be prioritized the same way that you prioritize features on the features board.
Although epics reside within the workspace and release where they will be completed, you can assign an epic to child features from multiple workspaces and releases.
Manage epics
The Features tab in your navigation includes four different ways to manage your epics and features. Depending on your workspace type, some of these are disabled until you customize your navigation to show them. The available pages are:
Board: A view of all your epics and features across all your releases and parking lots.
Details: The details view of epics and features in a given release.
Prioritization: A view to help you group, rank, and score features and epics by product value.
User story map: A view of how your work affects your user's journey.
Workflow: A kanban-style view of your initiatives, epics, features, and requirements.
To switch between your views, you can use the navigation bar at the top of your page. However, if you have used filters to focus your view of your epics, use the Change view type dropdown to switch between several common views while retaining any filters you have added.
Filters you add yourself will transfer to a new view. Page filters — filters associated with the original view that cannot be removed — will not appear on the new view.
Your View type options are:
Board: A view of all your epics and features across all your releases and parking lots.
List: A prebuilt list report of your epics and features.
Workflow: A kanban-style view of your initiatives, epics, features, and requirements.
Roadmap: The features roadmap is one of the most useful ways to visualize the progress of your epics and features.
Let's focus on the two most commonly used views to manage epics: the features board and the features detail views.
The Features Board page shows epics, features, and their associated releases. Epics and features can be rearranged into a priority order within a release by dragging them to their desired position.
To find specific epics, you have two search options.
Use the in-page search bar to filter your board to only view specific epics, by searching for epic cards that include the text of your search terms in their Name, ID, or any fields visible on the card.
Run an account-level search while you are on the features board. Enter your search terms, then click into the Features board tab to see the relevant results from your features board.
The Features Details page displays one epic at a time, allowing you to see every detail at a glance and a collapsible list of other epics in the same release to the left.
The Features Details page is hidden by default for new Aha! Roadmaps accounts. If you would like to enable it, you can do so by customizing your menu navigation.
You may find it useful to break down the work being done in an epic even further, using features, to-dos, and comments.
Features are the fundamental unit of work. You can define them with descriptions, requirements, attachments, and whiteboards that articulate the exact challenge that you are trying to solve. You can organize them into releases (containers for work organized around a release date) and then use two epics views on the Gantt chart to see how your features contribute to the progress of your epic. Click the Related tab, then click Add to add one.
Comments allow you to collaborate on a single epic without losing track of the conversation. Anyone on your team can comment on an epic by clicking the Comments tab, then clicking Add comment. Type the @ key to tag members of your team and the # key to link another Aha! Roadmaps record.
To-dos are as simple as they sound. They allow you to assign a piece of an epic to one or several people. Click the To-dos tab on a feature card, then click Add to-do to create one. Then, describe it and assign it to a member of your team.
Enterprise+ customers can enable a special type of to-do, called a work request, to track cross-functional work across teams.
Sync strategic links between records (Enterprise+ plan)
Keep strategic links accurate even as record links change. Enterprise+ plan customers can create an automation rules so that when you add a feature to an epic, the feature is tied to the epic's goal and initiative. You can also add automation rules to ensure changes to an epic's goals or initiatives automatically apply to its underlying features.
Automation rules like these give you the freedom to move work where it best fits, with full confidence that your roadmap remains accurate.
Organize customer research
To define exactly what your customers want, you need to be able to gather all of your research — including customer interview notes, related ideas, and polls — in one place. The Research tab (included on all features, epics, releases, and initiatives) brings all this information together.
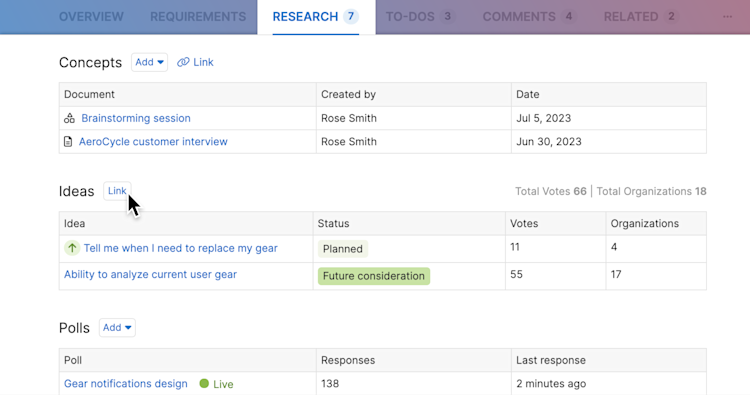
You may need to click the More options button to view the Research tab. You can customize your record layout to change the tabs' order.
This tab is organized into three sections.
Use the Concept section to link related notes and whiteboards, making it easy to find customer interviews, market research, user flow diagrams, and more.
Under Ideas, you can view promoted ideas, as well as any other requests that are useful to reference.
The Perspectives section is where you can create and manage polls, empathy sessions, and in-app feedback. (This functionality is included in the Aha! Ideas Advanced plan.)
Report on epics
Once you have your epics defined, you can create reports to share with your stakeholders. The toggle that appears on the features roadmap allows you to visualize the epics that will be shipping in upcoming releases. The now, next, later roadmap visualizes a summary of your plans for epics (or features or initiatives). You can also build custom analytics reports and roadmaps with data from epics.
Show epics on the Gantt chart
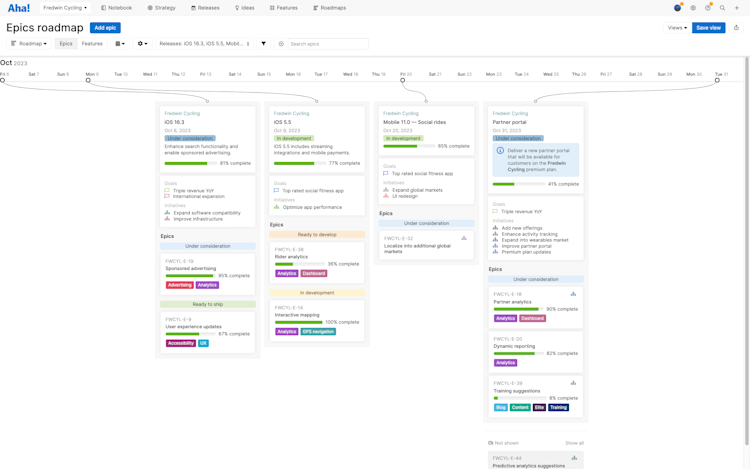
It can be helpful to visualize epics in a Gantt view to see how your releases affect your epics. Navigate to Releases Gantt to see this view.
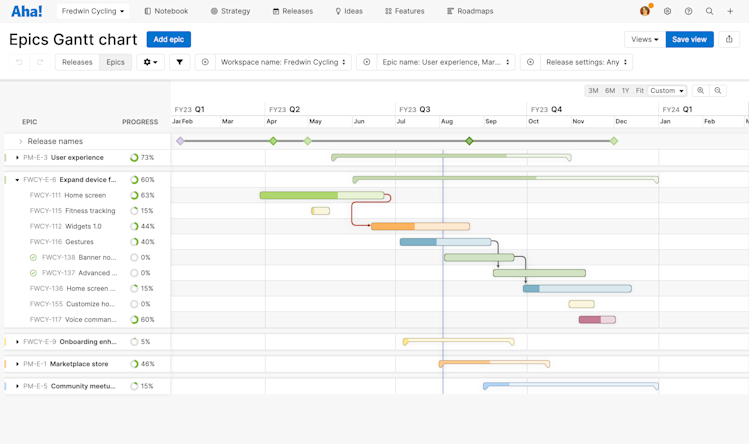
There are two ways to visualize epics on the Gantt chart.
To view a Gantt where the primary relationship is between epics and their features, open the Gantt type dropdown and select Epics and features. You can customize this view just as you can the releases view, including the ability to add dependencies between features and epics. You can also sort epics alphabetically, as well as by start date, end date, or score.
You can choose to color the bars by Workspace or Release as well as Status, Assignee, and Type.
You can see a new field at the top of the Gantt view called Release names. Click this to see the Release dates of the releases in the date range you have chosen. Note: The Release names section will display releases linked to records visible on the Gantt chart. If you have expanded an epic to show its child features, then the Release names section will display all releases linked to that epic and its child features. If you collapse the epic to hide its child features, the Release names section will just display the release linked to the epic.
You can sort epics by their Aha! Roadmaps Score in addition to their Start date, End date, or Name. Note: If the data you sorted by changes over time (or if you drag the epics to create a custom sort order), your Gantt chart will not automatically re-sort itself. If you ever want to re-sort your data by one of these options, just reselect that option from this submenu.
Both features and epics without dates appear in the epics view as well. Features will appear at the start of an epic with those same hazy borders to their bars. Epics will span the width of the timeline with hazy borders on their bars. You can add dates to dateless records, or hide features without dates from the Gantt — choose the More options button next to an epic to Hide all features with no dates, or the More options next to an individual feature to Remove from Gantt. To display the feature again, click the More options button beside the epic and select Show hidden feature.
To view a Gantt where you can visualize features together with their releases and epics, open the Gantt type dropdown and select Releases, epics, and features. This Gantt chart will features within their releases, and any epics associated with those features, even if the epics are not part of the features' release. This option is useful for a comprehensive view of your product plans.
As with the releases Gantt and the epics Gantt, you can customize the comprehensive Gantt to include the information that helps it communicate most effectively. Features, epics, and releases without Start or End dates will appear on this Gantt with hazy borders to indicate missing dates. You can add dates to dateless records, or hide features without dates from the Gantt — choose the More options button next to a release to Hide all features with no dates, or the More options next to an individual feature to Remove from Gantt. To display the feature again, click the More options button beside the epic and select Show hidden feature.
Just like any Gantt chart, you can expand the right sidebar to track change history.
Use epics in integrations
Epics are available to integrate with any 2.0 integration.