Aha! Develop | Notes
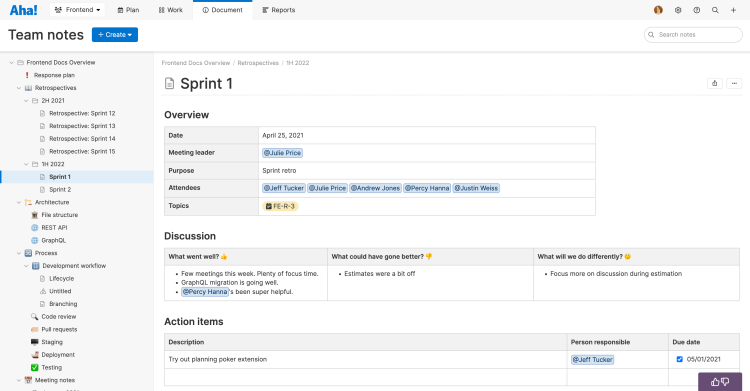
Use notes to create wiki-like documentation for your team. Document processes, architecture changes, scrum ceremonies, or anything else that will help your team complete excellent innovative work.
You can nest notes along with whiteboards into collapsible hierarchies, collaboratively edit them with your teammates, add saved views to them, and visualize them by date. Notes might look simple but they provide a powerful way to capture and share information. You can even create personal notes for private use.

Click any of the following links to skip ahead:
Create team notes
Create a note
From the notes page for your team, click Add and select Note. The new note will appear.
Selecting Whiteboard from the create menu will create a whiteboard instead of a text note. Whiteboards are organized in your nested hierarchy alongside your notes.
Use the text editor to create your note and format it with headings, lists, tables, and inline media. You can also embed whiteboards and assign to-dos and watchers and start a discussion in the note's comments. Add a Date to a note to add it to Recent notes section of the My work page for everyone watching that note.
Add Tags to your notes below the date field. This is a flexible way to categorize your documents without using folders and enables you to search documents by tag. You can also add a custom field to your documents layout to track relevant information.
Report on your workspace documents and pull in valuable information from custom fields and tags you have added to your documents.
Create a copy of a note
You can create copy of any note. Right-click a note's title from the List view or click the More options button on an open note. Then select Copy note. A copy of the note will open and will appear below the the original note.
If your note has a date added, you can copy it to the following week. This is a great option for preparing agendas for recurring weekly meetings. To copy a note to the following week, click its More options menu and select Copy to next week. A copy of the new new note will open with next week's date configured.
Copy note Same date will create a duplicate of a note with the same date as the original note.
Use personal notes
Users with reviewer permissions do not have the ability to create personal notes and whiteboards. Reviewers added to your account prior to September 7, 2023 will continue to have access to any personal documents they created prior to September 7, 2023.
Some notes may be just for your personal use. Maybe you have a great idea for a new strategic opportunity and want to jot down some unfiltered thoughts. You might be drafting a presentation and want to work on the outline before you share it with your team. Or maybe you just need to write down the minutes of a meeting.
You can find a notes section just for you on your My work page. To get to them, open the workspace selector in the upper left and click My work. On the left side of your My work page, you will see a section called My documents. You can create personal notes and whiteboards from here.
Aha! users with owner and contributor permission levels can use personal notes.
Unless you share a personal note, it is only visible to you. They use the Aha! text editor, just like team notes, and you can #mention other records if you need to. Records you #mention will not link back to your personal note and you cannot @mention other users.
Add a Date to any workspace note that you are watching to have it appear on your Recents section of your My work page. Any note or folder that you are watching that has a Date added will populate here for the selected date regardless of its workspace location. You do not need to add yourself as a Watcher to every workspace note you want to see it on your My work page. You can watch all the notes within a folder, such as a folder containing team meeting notes. Just add yourself as a Watcher to the parent note in that folder. Then you will automatically be added as a watcher to all child notes in the folder — and if any of those notes have Dates on them, they will appear on your My work page on that date.
Lock editing
You can protect any note from accidental edits so you do not lose important information. This is perfect for specific team notes that you want to be read-only for reviewers that have edit access to team documents.
Lock editing for any team or personal note. Click the note's More options menu and click the toggle to Lock editing. Do the same action to unlock it when you are ready for it to be edited again.
Workspace owners and contributors can lock and unlock editing for team documents.
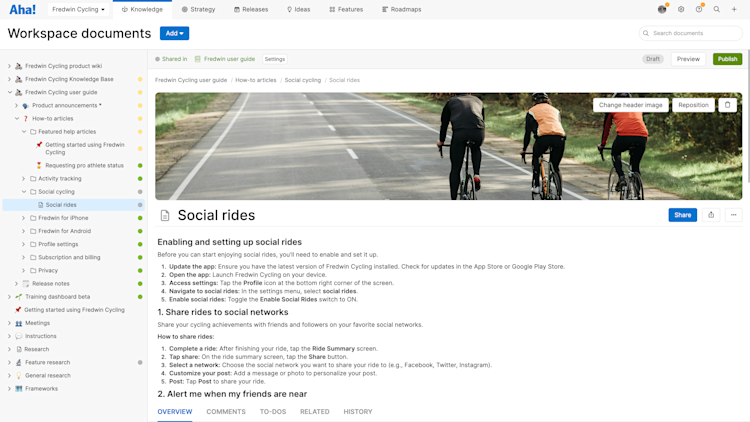
Add a header image
Add a header image to your note to add visual interest or help readers recognize a document's content at a glance.
Hover your mouse above any note or meeting's title and click Add header image.
Select an image from your computer to upload.

After uploading your image, you will see it at the top of the document. It will be resized automatically. If you want to make changes to your header image, hover over the image and select an option in the upper right:
Change header image will prompt you to select a different image from your computer to replace the current image.
Reposition will enable you to click and drag the image to reposition it.
The Trash icon will remove the image from the document.
Use templates
Note templates bring consistent structure to your documentation. Use the whiteboard and note templates in your template library for sprint planning, creating meeting agendas, PI planning, and more. You can access your template library and instantly add a new template to team or team notes.
Add a new note from a template
Click Add from your team or personal notes. Then click Use a template to open the template library. Templates will be listed in alphabetically order, but you can use search if you are looking for something specific. Use the Categories listed on the left side of your template library to find templates to support a specific purpose.
If you have created custom team note templates in your team settings, you will find them in the Workspace category.
Click a template to see more details. From here, you can click Use template to add it instantly or Learn more to view detailed guidance and best practices on using it.
Add a template to an existing note
If you are already editing your note, you can add a note template to your existing draft. Click the More options menu in the text editor's toolbar and select Template to access the template library. Find the template you want to add and click Use template to add it wherever your cursor is in your draft.
Team owners and contributors can access the template library from team notes. Any user can access the template library from their personal notes.
Create a new note template
If you are a team owner, you can create custom note templates for your teams. Contributors can create notes from existing templates.
Shared note templates are customizable using the Aha! text editor, so you can add tables, images, videos, and even Aha! views.
To create a new note template, navigate to Settings ⚙️ Team Document templates. Then click Add document templates and click Note.
To create a note template from a note you are currently editing, select the More options menu in the upper right corner of the note and select Save as template. Then enter a name for the template and click Create template.
You can only create templates from team documents.
You can find all custom note templates created in your account in the Workspace section of the Aha! template library.
Draft and improve text with AI
You can use the artificial intelligence (AI) writing assistant in the Aha! text editor to help you create clear, polished text in the right tone — so that you can communicate effectively without spending extra time and effort. Use AI to draft emails, refine what you have already written, summarize long passages, and more.
Click the wand icon on your toolbar to prompt AI to generate a first draft of your note. Highlight existing text and click the wand to prompt AI to apply changes in tone, summarize passages, make formatting changes, and more.
Insert media inline
You can add images, audio, and video files to your note inline to add context to your note's content. When you add media, it will appear alongside the text in your note. Inserted audio and image files will include a play button — so anyone who has access to your note will be able to play the audio or video file you have added without leaving your note.
To add media, click the Image icon in your text editor's toolbar. Then select the media file you would like to add and click Attach. The file will appear inline and also as an attachment to your note.
Supported audio file types include mp3, .wav, and .ogg. Supported video files include .mp4, .webm, and .ogv, and should be smaller than 300MB.
You can also embed media hosted by YouTube, Vimeo, or Figma. Paste the media's sharing URL to embed a preview. If the media is a video, you can play it directly from your note.
Organize your notes
Once you have created a few notes and whiteboards, it makes sense to organize them. Bringing structure to these documents is as easy as clicking and dragging them in the left side panel of the notes page.
Folders
Folders are a simple way to keep your notes organized.
To add a folder, click Add and select Folder from your team or personal documents. Name your new folder, then drag and drop it into the desired place in your document hierarchy.
If you want to include a description, try using parent and child notes in your document hierarchy.
To add a document to your folder, select your folder and then choose the type of document you want to add. Drag and drop existing notes to move them into a folder.
Parent and child notes
Parent and child notes are organized just like systems of folders. The only difference is that instead of having a folder as a container for a group of notes, one note serves as a parent note with child notes nested below it, setting up a nested hierarchy. This is useful when you want to include specific directions or details to a group of notes for context.
To nest one note under another, click it and drag it on top of another document.
To remove a note from a parent-child relationship, click it and drag it to a new location.
Reorder notes
To reorder a note, click on it and drag it to your preferred order. If you drag a parent note, all nested child notes and whiteboards under it will come with it.
You can drag parent notes to new locations whether they are expanded or collapsed, but it might be easier visually to do this while they are collapsed.
When you drag a note or whiteboard to a new location, the blue bars in your Aha! Roadmaps account will show you where it will land in order.
A thin blue bar means your note will exist above or below another document in the order.
A thick blue bar means that your note will be nested under another document in the order.
Sort notes
You can quickly sort a folder's contents to keep your documents organized. Right-click a folder or parent document to sort its contents by Name or Date created.
Note collections and standalone notes
Organizing your notes is just the first step. As you build out the team and personal notes in your Aha! account, your notes hierarchy can become quite complex.
Instead of scrolling through a hierarchy expanding every parent note, click on a parent note or folder to see a preview of all its child notes.
Note collections — child notes with sub-notes of their own — display here as tiles. Each collection includes the first three lines of the note's description, the top three child notes, and a total note count.
Standalone notes — child notes without sub-notes of their own — are listed at the bottom.
You can control what notes appear in these views by clicking on a parent note, then clicking More options Hide nested notes.
Customized title icons
Every note you create has a title icon. By default, this is a page icon for standalone notes, and a folder icon for parent notes. You can change these title icons to emojis to help your notes and note collections stand out.
To do this, open a note and click its title icon. Click or search for any replacement emoji you prefer, and the title icon will update.
Embed views
Notes are excellent tools for collaboration and documentation, so it often makes sense to add Aha! Develop views directly to a note — or to embed view extension contributions from extensions such as Figma, Invision and Adobe XD. Workspace owners, contributors, and reviewers can add Aha! views to notes.
Aha! Knowledge Advanced plan subscribers can publish saved views that have been embedded in notes to a live knowledge base. Please contact us if you would like a live demo of Aha! Knowledge Advanced or want to try using it in your account.
To do this, click the More + dropdown and select Add Aha! view. From there, choose to Use existing report to add an Aha! view or Add Develop extension panel to embed a view from an extension with view extension contributions.
When you add one an Aha! Develop view to a note, Aha! Develop copies the view and your note view displays the copy. This way, changes you make to the configuration of the original view — the view's type, style, or filters — will not affect the information displayed in your note. Changes you make to your Aha! Develop data will be reflected in either view.
Extension panels you add respect the permissions set in the external tool. This means, for example, that a publicly shared design will be visible to all users, while a privately shared design will require users to be logged into the service.
Once you have added your view, click and drag a corner to Resize it. Or click its More options button to Open the report it is based on, Configure the view you have added to your note, or Remove the view altogether. When you Configure the view, you can change the view's Title or — for chart views in accounts integrated with Aha! Roadmaps — choose to show the chart's Legend.
Embed a whiteboard
You can embed a whiteboard directly into your note to add diagrams, sketches, and other visuals alongside text in your note. While editing a note, just click + on the text editor toolbar and select Whiteboard. A new whiteboard will be added below your cursor. Click the pencil icon to edit the whiteboard. When you are finished editing the whiteboard, click the X to exit and return to your note. To remove an embedded whiteboard from a note, click the trash icon and click to confirm that you would like to delete it.
Inline comments
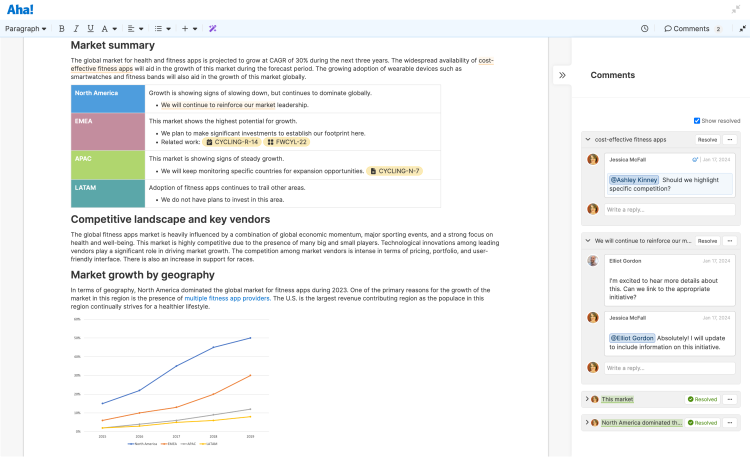
In addition to collaborative editing, notes in Aha! Develop support inline text comments. Use them to highlight the exact part of the note you want to discuss, then create conversation threads to focus on and resolve the issue.

To create a new inline comment, highlight the text you want to comment on and click the comment icon that appears on the right side of the text editor. Your text will be highlighted and underlined in orange, the Comments side panel will appear, and you can start creating your comment. Click Save comment once you are done.
When your note is in full-screen mode, you can click >> to open the side panel at any time and view a note's existing comments.
If you are using a note template from the Aha! template library, you can also view best practices for that template in the side panel.
Click Resolve on any comment to remove it. You can check the box next to Show resolved to view any comments that have bee previously resolved. Resolved comments will be highlighted and underlined in green and you can always reply to a resolved comment to reopen it.
Inline comments have access to the full text editor, so feel free to format your text, @ and #mention Aha! Develop users and records, add and color tables, or insert inline media.
Revert to previous versions
Every note created automatically tracks the history of edits that have taken place. You can revert back to previous versions of a note by clicking the History icon in the text editor and then moving the slider to the time frame you want to revert to.
Record and user mentions
Use #mentions to reference Aha! Develop records, or to reference your team-level note from any Aha! Develop text field.
Use @mentions to reference users in your Aha! Develop account. @mentioned users will be added as watchers to your note.
Move notes
Use the More options button on notes to move notes between teams. You can also use the More options button on a personal note if you want to move it to a team. If you move the note at the top of a hierarchy tree, all child notes move as well.
You can also move a team note to a personal note. Instead of choosing Move to team from the Move note menu, select Move to personal notes.
Reference Aha! Develop records
Team-level notes can be added as related records to other data objects in Aha! Develop. To add a related record to a note, click on the More options button in the upper-right of the note and select Link to another record. Once linked, a new Record links section will display at the bottom of the note. This will reference the related data records, which you can visualize to keep track of the relationships.
Share and export notes
Once you have created your note, you may want to share your work with people who can give feedback and add value. Share your note with anyone to collaborate and drive alignment — even with people who are not users in your Aha! account. Account administrators can enable or disable all note sharing for your Aha! account at any time.
Share a note
You can share a note with anyone — just send them a shareable link. Anyone in your account can share a personal note that they have created. Owners or contributors can also share team notes — but viewers and reviewers for a team cannot share team notes.
To share a note:
Open your note and click the Share button in the upper right corner.
Click Get shareable link.
Select whether anyone with the link can View or Edit the note.
Click Copy link.
Share the link with anyone.
You can disable the link whenever you choose. If you disable the link, anyone who has the link but has not yet accepted access to the note will not be able to access it.
If the person you want to collaborate with is not a user in your Aha! account, they can still collaborate on your note:
If they do not have an Aha! account or trial in progress, they will be prompted to create a free guest account. After they do, they will be able to access the document you shared with them.
If someone accesses your shared document while they are in a trial period and then their trial expires, they will not lose access — their trial account will become a free guest account so they can continue to access and collaborate on shared documents.
Users with guest access to any document in your account will not have access the document's Share menu.
Viewing and editing permissions
After you have generated a shareable link, you can configure viewing and editing permission for any individual note. Select the Share menu. You will see two different permission sections:
Guest access: Anyone who has accessed your note from a guest or trial account will be listed here. Click anyone's initials to change their permission to Edit, View, or View and comment. Hover over a guest's initials or avatar and click the trash icon to revoke their access.
Reviewer access: The default reviewer permissions for your document will be inherited from your team settings, but you can change them on a per-document basis. Select View or Edit to update all reviewer's permissions for your note.
If a reviewer has permission to view, but not edit a document, they can click Request edit access to send an email to the team owners and the person that created the document. A team owner can then choose to update the edit permissions for all reviewers.
Accept a note
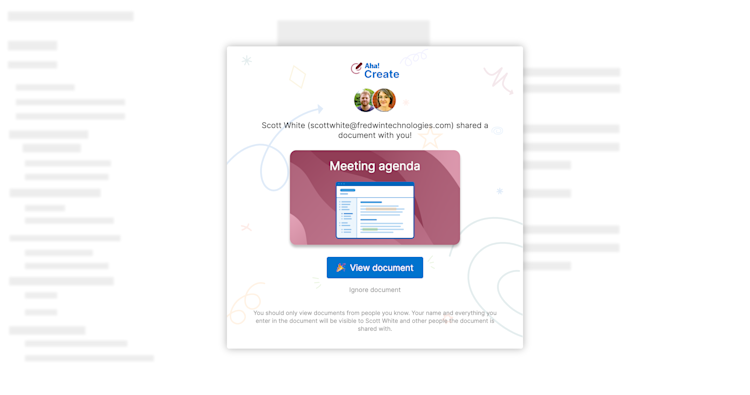
Your colleague will provide you with a link when they want to share a note with you. Click the link to open the invitation to view the document. You can then select an option to View the document or Ignore the document.

You will be prompted to log in or sign up if you choose to View the document.
If you do not have an Aha! account, you can create a free guest account to view the document.
If you do have an Aha! account, log in to the view the document. After you have accessed it, the document will appear in the Shared with me section of your My work page. If it is located in a team that you have access to in your account, it will open within that team.
To see who has access to a shared document and will potentially see any edits you make, click the Shared icon at the top of the document next to its title.
Configure sharing settings
Account administrators can navigate to Settings ⚙️ Account Security and single sign-on and uncheck the box next to Enable document sharing at any time to turn off link sharing for notes. Doing so will turn off all link sharing in the account for notes and whiteboards. Any links that were generated prior to disabling this setting will stop working, and both personal and team notes and whiteboards will no longer be shareable with users outside of your Aha! account.
When document sharing is enabled, anyone in your Aha! account can share a personal note that they have created. Owners and Contributors can share team notes. Viewers and Reviewers cannot share team notes.
Export a note
The Export button offers you several options to export and display your note. You will find the Export button in the upper right corner of your screen. From the Export menu, you can:
Add to Whiteboard as image to add an image of your note to a new whiteboard in your personal notes.
To share your note as a webpage, select Share as webpage.
For a static version of your note, export it to PNG image or PDF document.