Aha! Roadmaps | Workflow approvals
Workflow approvals are ideal any time you need to standardize your approval process. Major initiatives might need budgetary approval before work can begin. Content marketing campaigns might need to pass a copyedit review before publication. Workflow approvals in Aha! Roadmaps streamline review cycles and focus your team on consistent delivery and high-quality work.

There are two types of workflows in Aha! Roadmaps — flexible and fixed.
Flexible workflows are best suited for teams who do not need a formal approval process to manage work.
Fixed workflows are best suited for workflows that need to be consistent and require formal approval before work can proceed.
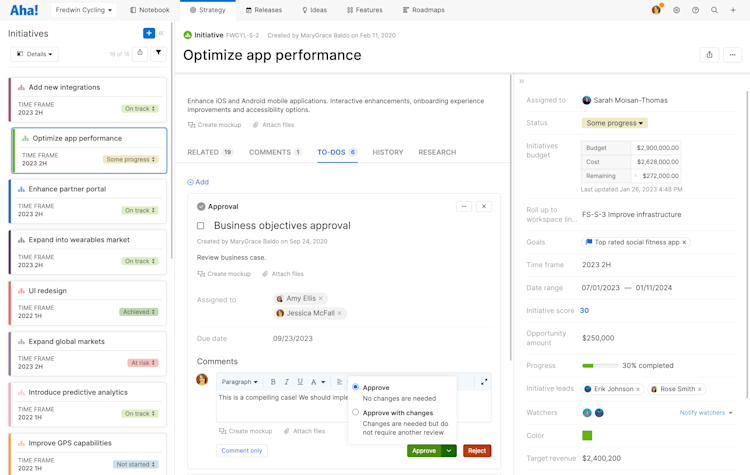
In a fixed workflow, the primary way to change the status of a record is via a transition button. Adding an optional approval step to a transition automatically creates an approval task, assigns it to an approval group, and sets a due date. A workflow approvals section will appear in the drawer view of your records. This is where assignees can choose to approve, approve with changes, or reject work. You can also view the status of approval tasks in a pivot report.
Integrations can update an existing record's status if you have set up your integration configuration mappings to include the Status field, and you have created a fixed workflow for that field in Aha! Roadmaps. CSV imports will not change an existing record's status — but you can import new records to the right status in a fixed workflow and bypass any approvals.
Because workflow approvals require fixed workflows and because approval gates often represent watershed moments in a record's lifecycle, they pair very well with advanced custom templates. Advanced custom templates, available to Enterprise+ customers, allow you to map a new custom record layout to each workflow status, so that, for example, after that initiative passes budgetary approval, the initiative record layout changes to include a read-only budget field.
Click any of the following links to skip ahead:
Create workflow approval groups
If fixed workflows make sense for your team, you can decide to add approval gates to any status transition. Approval gates block a record from moving to the next stage in its workflow until an approval group gives their approval. An approval group could be a group of people or a single user in your Aha! Roadmaps account.
To create a workflow approval group, you will need to be an administrator with customizations permissions.
Navigate to Settings ⚙️ Account Approval groups to get started.
Click the Add group button to create a new group. At this point, you aren't assigning users to your group; you are just creating the group name.
Approval groups could be called Legal, Finance, Subject Matter Experts, Copyedit — any group that you think will need to review a record before it can progress in its workflow.
Populate workflow approval groups
Now that you have created a workflow approval group, it is time to add users to it.
To populate workflow approval groups, you will need to be a workspace owner.
Navigate to Settings ⚙️ Workspace line Approval groups to get started. If you populate the approval group from the workspace line level, all child workspaces under that workspace line can choose to inherit the users in the approval group.
You will see a list of available approval groups and any users inherited from a workspace line. Add users in the Users for this workspace column. Note:
Any users you add here will replace any users inherited from the workspace line.
Users are not notified when they are added to an approval group. They are notified when they are assigned an approval to-do.
Navigate to Settings ⚙️ Workspace Approval groups to see your populated approval groups. Just like you did in the workspace line, you can also choose to add users to the Users for this workspace column and create an approval group unique to that workspace.
Add approval gates to a fixed workflow
With approval groups created and populated, you are ready to add approval gates to a fixed workflow.
To create a fixed workflow, you will need to be an administrator with customizations permissions.
Navigate to Settings ⚙️ Account Statuses and workflows to get started.
From the page, you can choose to Add a new workflow or use the filters to select an existing one.
Once you have clicked on a workflow, select Fixed. The Transitions column will change to Transitions and approvals.
You will also see the option to Restrict approval changes. When selected, only administrators with customization permissions will be allowed to edit or delete approval to-dos created by the workflow.
In a fixed workflow, records can only progress along the statuses and transitions that you allow, so you will need to create a transition for every allowed status change. Transitions do not need to have approval gates.
You can add approval gates to any status transition. Click Add status transition or click Edit on an existing transition to add an approval gate. Add an approval gate to the originating status — so, if you want a formal approval before an initiative moves from Not started to In progress, add a status transition to the Not started status transition.
Create a separate status for the review period. Then, for example, your record can transition from Not started to In review to In progress. An approval gate between In review and In progress would move the record to In progress if approved, and back to Not started if rejected.
Once you have the Add or Edit transition modal open:
Choose which status you want to transition to. Statuses can have multiple transitions and transitions do not have to be linear — Not started can have separate transitions into Will not do, Research, and In development, for example.
Check Approval required to add an approval gate. You can add multiple approval gates to each status transition if the workflow needs approvals from several different approval groups.
Approval gates function like to-dos, with a few key differences. They are assigned to approval groups, not individuals, and they can be resolved three ways: with Approval, Approval with changes, or Reject. When an approval to-do has been resolved, the record will move to the next status in the transition.
Name your approval gate the way you would a to-do, describing the task required.
Add a Description.
Assign the approval gate to an approval group.
Check whether the approval gate requires Any or All approvals. If there are multiple users in an approval group, this determines whether you need approval from each group member or only one.
Set the Due date.
Set the If rejected status. If the approval is rejected, this is the status the record should revert to.
Click Save to save your changes.
Note: You can change these to-do details later, even after the approval to-do has been sent, to personalize the approval to-do to the unique record and review.
Under the Transitions and approvals column, you will now see your transition.
Note: Remember, workspace owners will need to select your workflow in Settings ⚙️ Workspace Configure before records in that workspace will use your workflow.
If you change the workflow for a record type in Settings ⚙️ Workspace Configure, it will change the statuses for all records in that workspace, which cannot be undone.
Use advanced custom layouts (Enterprise+)
So far we have discussed custom layouts and custom workflows in a one-to-one relationship: one custom record layout for every custom workflow status. This means that members of your team will see the same arrangement of fields and tabs through the entire lifecycle of a created record.
But sometimes, your work is not that simple. If an initiative is is in the definition phase, for example, it may not need any of the fields yet that help you complete it. Instead, you might want to optimize the feature layout for the regulatory, financial, and legal teams who will be reviewing, researching, and funding the initiative. But once approved using an approval gate, you may need a more sophisticated layout for your initiative: a read-only budget field, user fields for the initiative lead, and custom fields to track expected revenue, set advanced estimates, or link to custom tables.
Enterprise+ customers can use advanced custom layouts to set a different custom layout for any workflow status that would benefit from it.
Use approval to-dos
You can be assigned an approval to-do three ways:
If you are a member of an approval group and a record transitions to a status with an approval gate.
If someone assigns you an approval to-do.
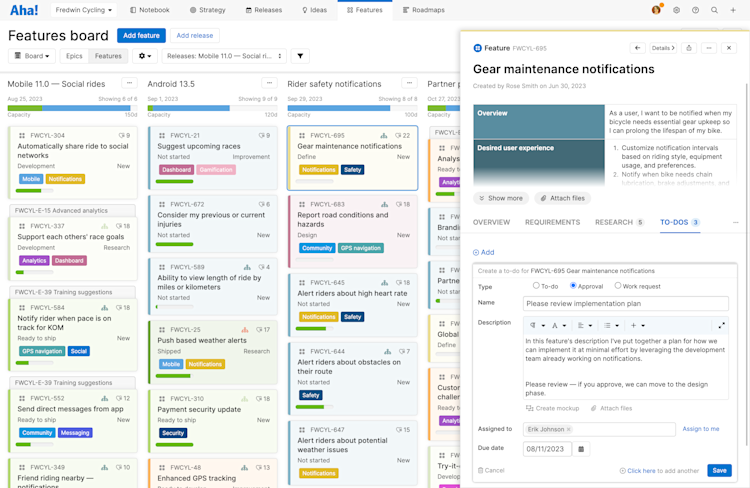
Anytime you create a to-do and choose the Approval to-do type.

Contributors can edit approval to-dos so that users can add useful details to the standard approval to-do.
Anyone assigned to an approval to-do has the option to Comment only, Approve, Approve with changes, and Reject. Use comments to discuss the approval and Approve with changes if your approval is contingent on a few minor changes that do not require another formal review.
Fixed workflow approval to-dos appear in the To-dos section of a record in a Pending status. You can assign these to-dos to individuals or to an approval group. When assigning to a group, you can select Any approval in the Requires field to allow approval from just one member of the group, or select All approvals in the Requires field to enforce resolution from every member before transition.
If you are using a flexible workflow but want occasional approvals, you can still create approval to-dos. These will not block a record from transitioning to a new status.
Again, you can assign these to-dos to individuals or to an approval group. Unlike fixed workflows, though, this type of approval to-do will be resolved when Any individual or member of the approval group transitions the status.
Aha! Roadmaps sends notifications to approval to-do assignees one day before the due date, the day of the due date, and each day after the due date until the assignee completes the to-do.
Report on workflow approvals
Just like other data elements in Aha!, you can report on workflow approvals.
On any record using a fixed workflow, scroll down to the Workflow approvals section and click View in pivot report to view a pre-built report on the approvals by record and status transition.
Build reports using Approval as a primary record type.
Once you have built approval reports, share them as webpages or add them to a presentation, and keep key stakeholders informed.