Aha! Roadmaps | Add features, phases, and milestones to a release
Now that you have a release, you will want to add features to it and structure it with release phases.
Features and epics represent the work that you will complete in your release. Release phases help you structure the flow of your release and come in two types: phases and milestones.
Phases are containers of work within your release — you may have design, development, and test phases, for example, and you can group features within phases.
Milestones are single important dates to your project — such as the date that design is completed or the date that the app store approves your mobile application.
Both types of release phases are optional. Add them if your release involves a lot of cross-functional dependencies or if they're helpful for organizing your release, and add custom fields to either type to help specify the type of information they display.
Use these steps to add records to your release:
If you want to drag and drop features or epics into a release, navigate to Features Board and open the parking lot slider. Drag feature or epic cards from the parking lot to your release.
If you want to add features individually or structure release phases and milestones, click on your release in the Releases Gantt view to open its detail or drawer view. From here, click on the Phases tab, then Add phase or Add milestone for phases and milestones, or the Related tab, then Add epic or Add feature for epics and features. Edit the details of each after you add them.
If you know exactly where you want to add a record to your release, expand your release on the left side of the Gantt view, then click the + icon between the two records where your new record should appear. From there, you can add a New feature, Existing feature (one that has been hidden from the Gantt view), a Milestone, or a Phase.
You can also use the + icon that appears alongside a phase name to add New or Existing features directly to the phase.
You can adjust the dates of features, phases, and milestones by editing the record — opening up the record and changing its Date range — or by clicking and dragging them around the Gantt view to the dates you prefer. You can also click and drag one end of a feature, phase, or milestone to edit just its Start or just its End date. Any time you adjust the dates of a record by moving them on the Gantt view, you will see a tooltip showing the exact date(s) you are moving them to.
Start and End dates are not associated with a timezone.
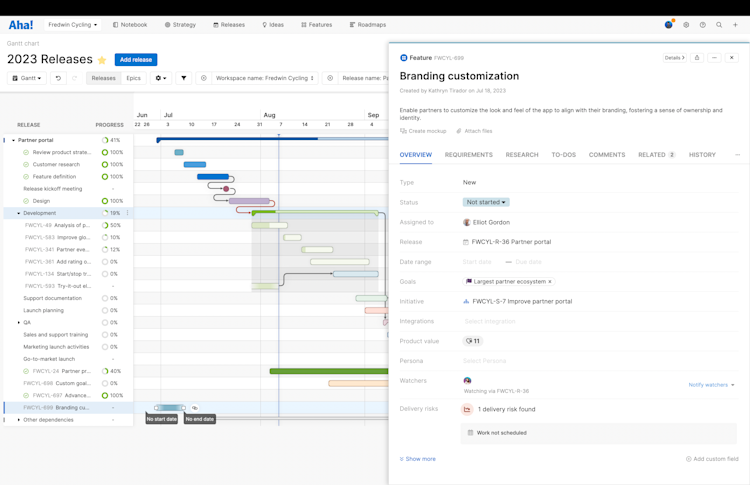
All features will be visible on the Gantt chart by default — even if they do not have Start and End dates. This way, you can organize them in the context of the rest of the release before assigning them dates. Features without dates will appear at the start of a release but with hazy bar borders.

Assign dates to a feature by clicking and dragging its bar on the Gantt view or by clicking on it to open the feature detail drawer, then editing the Date range fields on the Overview tab. You can also hide the feature from the Gantt view by clicking the More options button beside the feature's name and selecting Remove from Gantt.
Click on a feature, phase, or milestone from the Gantt chart to open its drawer view. From the drawer, you can also click the Details button to go to the details view for that record. The details page displays one record at a time, allowing you to see every detail at a glance. There is also a collapsible sidebar on the left that includes a list of all the same record types within the same release. Sort phases and milestones by start date, end date, and name. You can view and switch between all of your phases and milestones within a release, so you can seamlessly coordinate all the cross-functional work that needs to come together for a successful launch.