Aha! Roadmaps | Create and manage presentation themes
The way your presentation looks should never get in the way of what it says. However, designing a presentation with consistent branding and structure can take a surprising amount of time if you have to build each presentation from scratch.
We designed presentation themes to solve this problem. Create a theme to standardize branding, design, header and footer contents, and text styles — and every presentation that uses that theme will display those elements automatically.
Presentation themes include separate layouts for title and body slides. Your theme can be as simple as a header in your brand color for Quarterly Business Reviews or as sophisticated as a slide-by-slide pitch deck to standardize internal project submissions.
Click any of the following links to skip ahead:
Create a theme
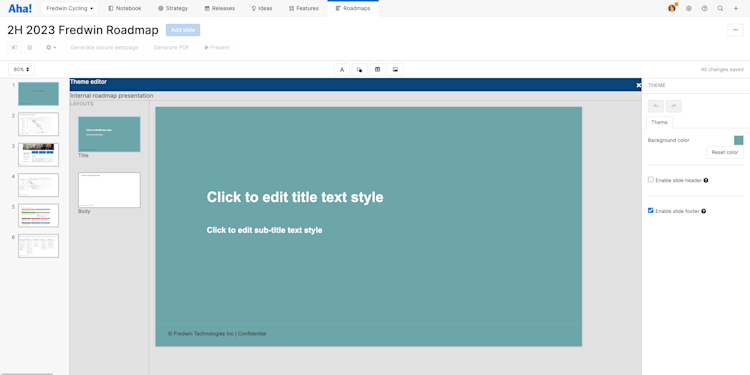
To create a theme, first create a presentation. On the right side of the slide editor, click the Themes tab, then click Edit theme layouts to open the Theme editor.
Workspace owners, contributors, and any users with appropriate custom user role permissions can create presentations and presentation themes.

The theme name will default to the name of your presentation. From the theme editor, you can rename your theme and adjust your theme's layouts.
Adjust theme layouts
Every presentation theme has two layouts.
The Title slide determines how title slides will look in presentations using your theme.
The Body slide determines how body slides will look in presentations using your theme.
You can edit and customize theme layout slides just as you would a regular presentation slide, but changes you make to a theme layout slide will apply to the slide layouts of every presentation that uses your presentation theme, so be intentional about what content and design elements you add to these theme layout slides. For example:
If you add a copyright notice to a body slide footer, that notice will appear on every slide in the presentation.
If you add a team member's profile picture to a title slide, that picture will appear on every title slide in presentations using that theme.
After you make changes to a theme layout slide, you will see the words Saving in the upper-right corner of the slide editor. Once your changes are Saved, they will be reflected in presentations.
The one exception to this rule is text style boxes. People who create a presentation based on your theme will likely want to add unique titles, subtitles, or body text to their presentation — but you may wish to standardize the look of that text. To do so, click on a text style box. Then use the Style, Text, and Arrange tabs on the right side to adjust the text style.
Share your theme
Once your theme looks good, click the X in the upper-right corner of the Theme editor to leave the editor. Back in your presentation, click the Themes tab in the slide editor, then click the Share icon to share your theme with the rest of your Aha! account. Select Share theme in the modal to begin sharing. To stop sharing a theme, click the Share icon and select Stop sharing theme.
Anyone in your Aha! Roadmaps account with access to presentations can view and use your theme if you choose to share it. You can still edit your theme while it's being shared, even after other presentations are using it — and any changes you make will be reflected in those presentations, which makes updating brand changes very simple.
As you might expect, you cannot delete a presentation while its theme is being used by other presentations, and you cannot change a presentation's theme while its current theme is being used by other presentations.
Any user who is a collaborator on the presentation where you created your theme can edit that theme. So if you want multiple people to be able to adjust the branding for presentations using that theme, add collaborators to your presentation.
Once you have shared a theme, you can see the number of presentations currently using the theme from the Themes tab of any slide.
Select a shared theme
To take advantage of a presentation theme, first create a presentation. On the right side of the slide editor, click the Themes tab, then select the theme you wish to use.
By default, new presentations start with just a title slide, with no header or footer. Once you add a body slide (which has headers enabled by default) or enable headers or footers, you will see those elements of the presentation theme.
The presentation theme will affect your presentation in two ways.
Specific text, shapes, or images added to the theme layout slides for that theme will display on your presentation slides. By design, you cannot move or edit these theme elements.
Text style boxes, which can affect slide titles, subtitles, or body text, will determine the style of whatever text you choose to add.
To add a slide to your presentation that the presentation theme will not affect, add a slide with No layout. You can customize these slides as you see fit.