Aha! Ideas | To-dos
To-dos are a powerful way for you and your team to manage tasks that need to be completed. You can add to-dos to most record types and screens in your Aha! Ideas account.
Click any of the following links to skip ahead:
Create a to-do
There are two types of to-dos.
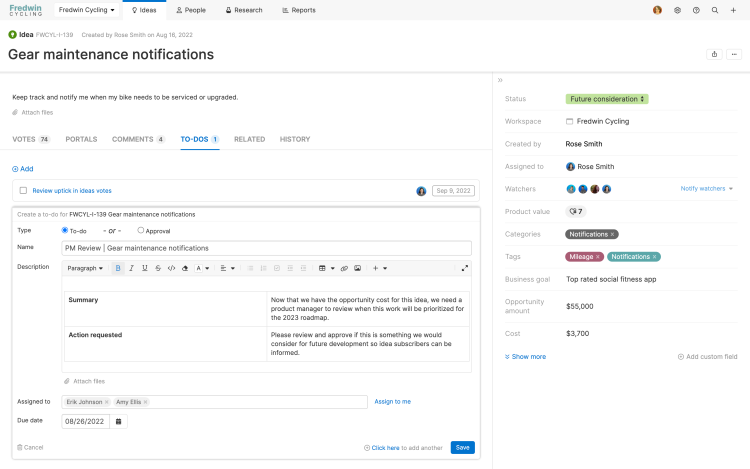
To-dos have a Name, Description, Assignee, and Due date. To-dos can also automatically recur. Assignees mark the to-do complete when they have completed the task.
Approval to-dos function like to-dos with two key differences:
They have additional resolution options. Users can choose to Approve, Approve with changes, or Reject an approval to-do.
They can be configured as part of a workflow approval gate in your status workflow, where they are assigned to a workflow approval group.

You can create either type of to-do from the To-dos section of a record. Click the + icon, select the to-do type, then fill out the to-do. Click Save to create your to-do, or click Click here to add another to create multiple to-dos.
If used as part of a fixed workflow, approval to-dos will appear automatically in the Workflow approvals section of a record.
To-dos do not have to be attached to an Aha! Ideas record. Click the + icon in the upper righthand corner of your screen to create a private to-do.
You can standardize to-dos to ensure the requests you make to teammates have the right amount of information and context each time. Create a note template in your workspace for your to-do. Then add the template to your to-do description from the text editor toolbar when creating it.
Assign to-dos
When you create and assign a to-do, or add or remove to-do assignees, the relevant users receive an email and a notification from Aha! Ideas with a link back to the relevant record. You can also assign to-dos to yourself (though Aha! Ideas will not notify you in that case).
You can create a to-do three ways: from an individual record, through a fixed workflow, or by clicking the + icon in the upper-right corner of Aha! Ideas to create a to-do not associated with any records. Users can choose to opt out of Aha! Ideas notifications on a per-workspace level, but since to-dos that aren't associated with any records also aren't associated with any workspace, users will always receive notifications about those to-dos.
Aha! Ideas sends notifications to to-do assignees one day before the due date, the day of the due date, and each day after the due date until the assignee completes the to-do.
Set up recurring to-dos
By default, a to-do is oriented around a single due date. But a recurring to-do can serve as a great reminder to complete tasks you perform on a regular basis. You can set a to-do to recur daily, weekly, monthly, yearly, or on a custom schedule.
To create a recurring to-do:
Create a regular to-do, including a Due date.
Click the Recurring dropdown and select the repetition interval.
Once you select an interval, you can see the Due date for the next to-do iteration.
Click Save to create your to-do.
The next occurrence of a recurring to-do will be created in one of two scenarios (whichever comes first):
When everyone assigned to the current to-do has completed it.
When you reach the current to-do's Due date.
A few more details are helpful in knowing what to expect when you set a recurring to-do:
Every instance of a recurring to-do will use the original to-do's Name and Description.
When you edit a recurring to-do's Name, Description, Due date, or Assignee(s), you will have the option to apply your changes to future to-dos. Once you have finished editing, you will see an option at the top of the to-do to Update future to-dos.
When you delete a recurring to-do, you will have the option to Delete the single to-do or Delete and stop recurring.
If a to-do is never completed, the recurring to-do will still be created — but it will not be created until the due date of its preceding to-do.
Only current to-dos will appear in reporting. Recurring to-dos that the system has not yet created will not be included in reporting.
Organize to-dos
To-dos are manually sortable so they can be organized by due date or other personal preferences. To sort, navigate to your My work page, then hover over a to-do until the cross appears. Click and drag the to-do to your preferred order.
Move to-dos
After adding a to-do to a record, you may find that it would be better located with better information. You can move a to-do from one record to another record from its More options menu. Just select Move to-do and use the search bar to find the record you would like to move it to. Then click Move to-do.
Report on to-dos
Like any record type in Aha! Ideas, you can report on to-dos.

Build reports on to-dos and their associated attributes, such as assignee, status, and due date.
On any record using a fixed workflow, scroll down to the Workflow approvals section and click View in pivot report to view a prebuilt report on the approvals by record and status transition.
Navigate to your My work page to get a quick snapshot of your to-dos or to-dos for members of your team.